|
Below are the top home trends of 2024. I’m particularly excited about the vintage revival trend. There’s something magical about integrating vintage artwork, wallpaper, decor, and furnishings into modern spaces—it brings a sense of nostalgia and character that’s hard to replicate. What about you? Which trend are you most excited to incorporate into your home this year? Share your thoughts in the comments below—I’d love to hear from you!
0 Comments
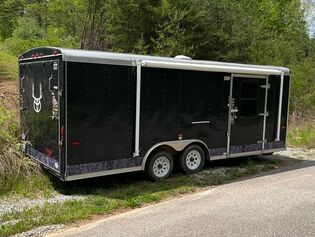
My husband and I recently bought a 24' cargo trailer that was previously used to haul a dirt bike to races all over the east coast. It was partially converted when we bought it with cabinets in the front, a water tank and outdoor shower, a portable heating & cooling unit, heavy, clunky fold down bunk beds, a dirt bike stabilizer, and various storage cabinets. Here are a few pictures at the time we bought it.
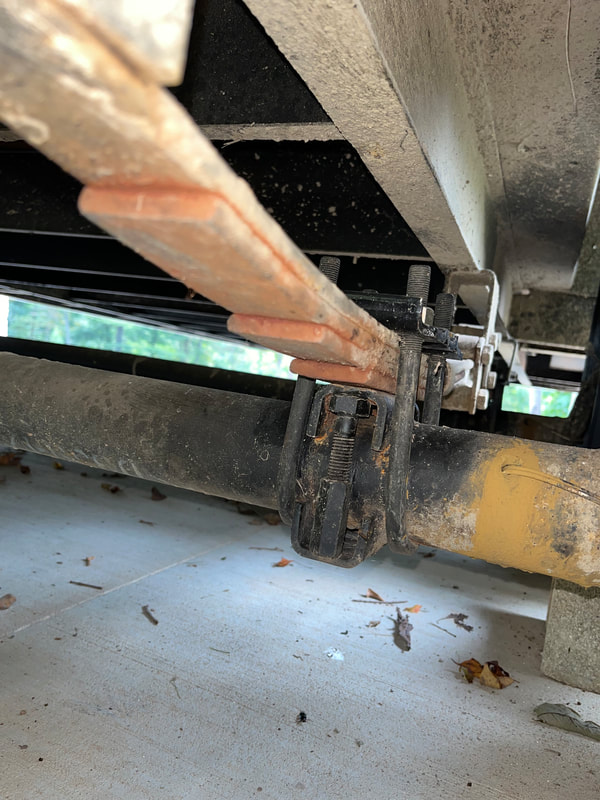
We live on a hill and the trailer would not make it up because it sat too low and would drag. My brothers put a lift kit on it and raised it up 6" inches. It now makes it up the driveway just fine. I apologize for the shaky video, I was trying to watch all the points of contact to make sure it would not drag.
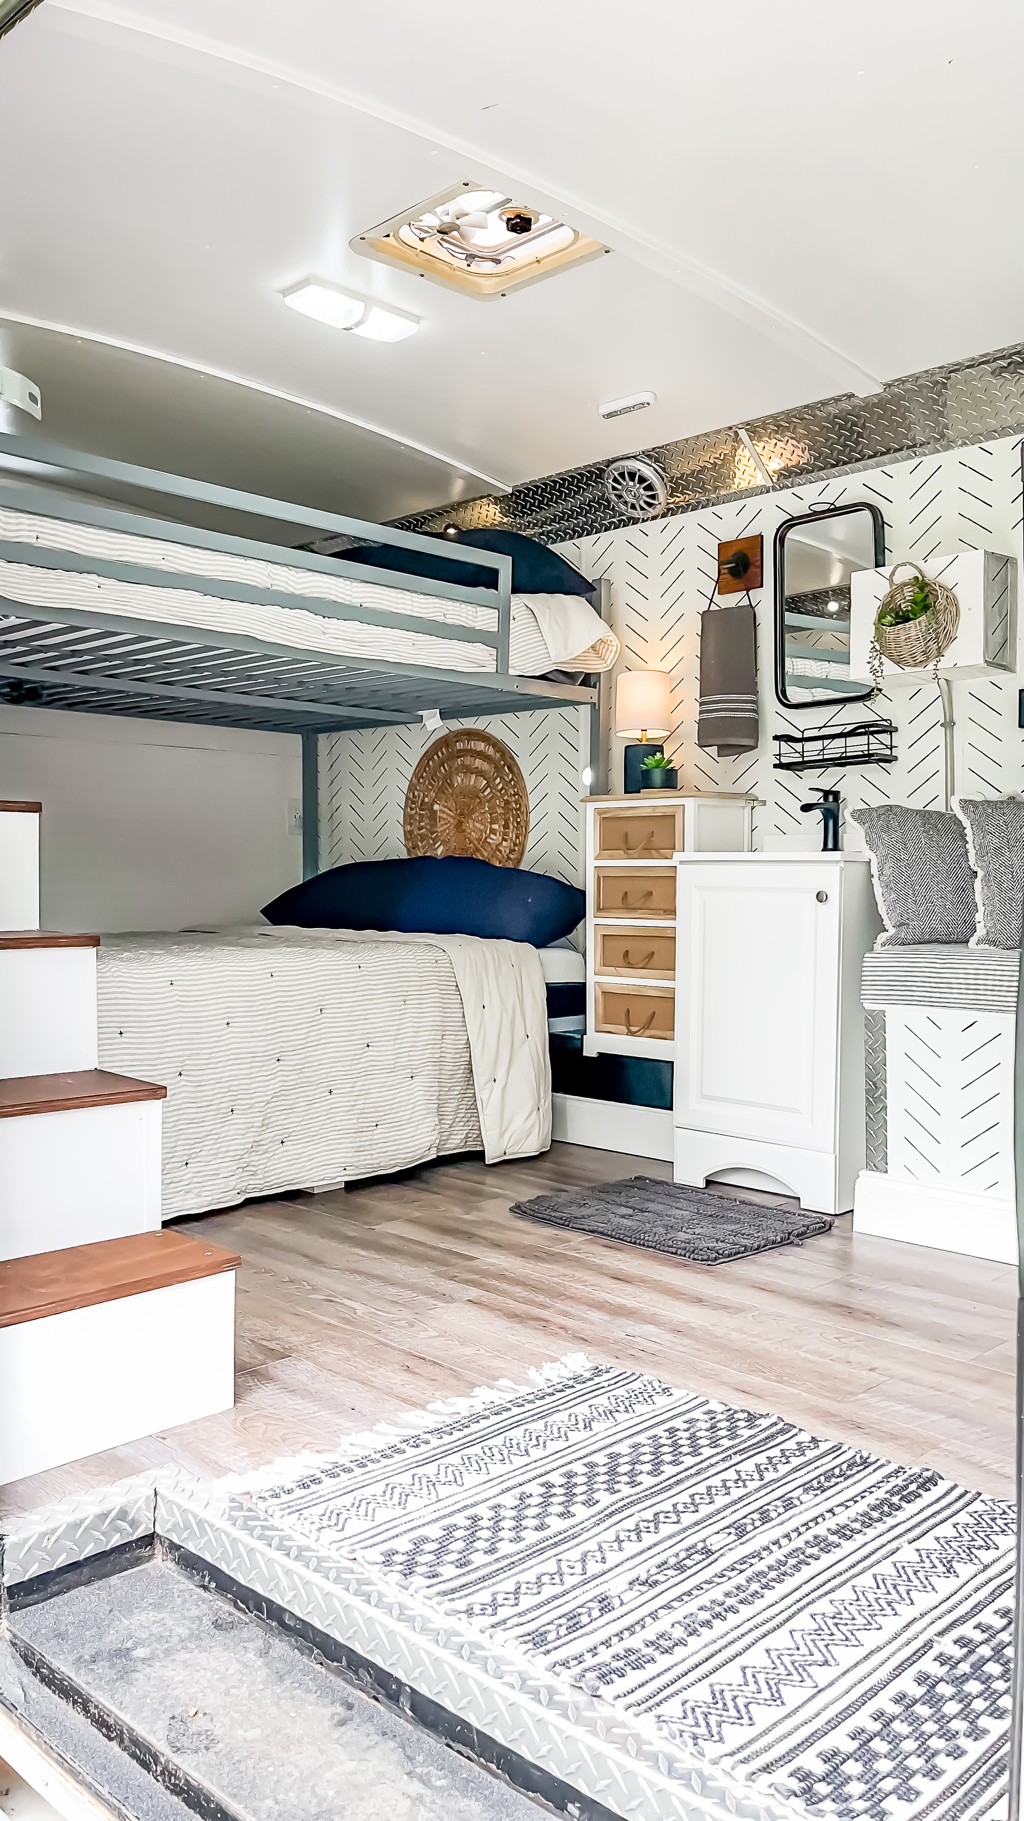
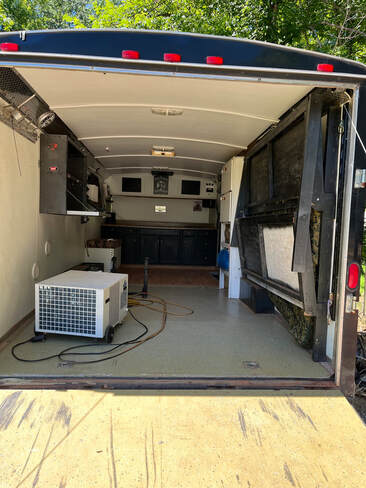
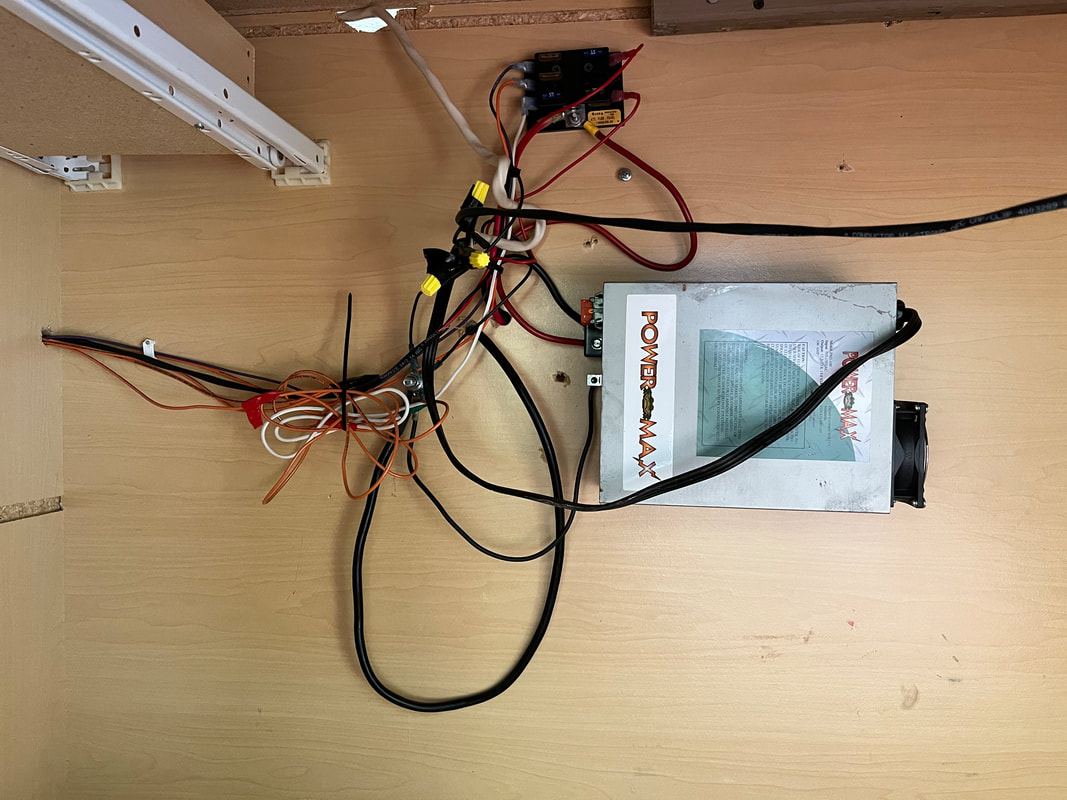
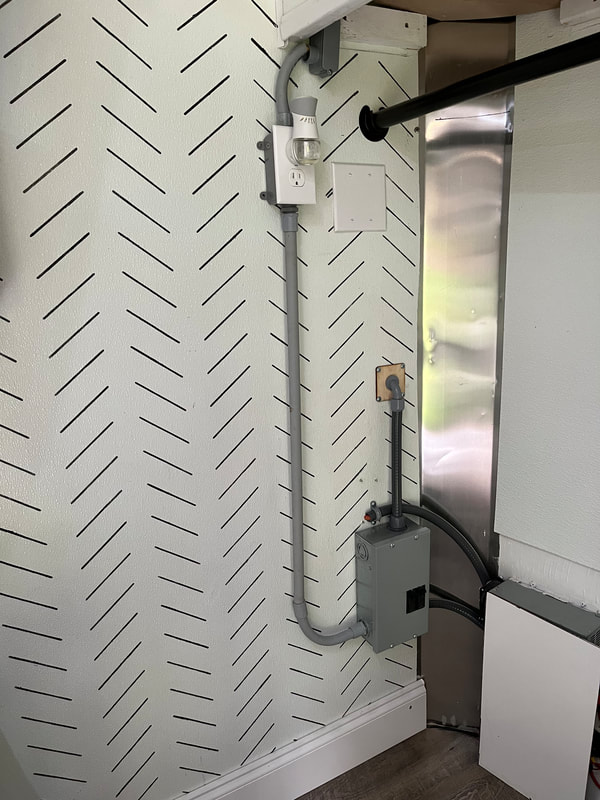
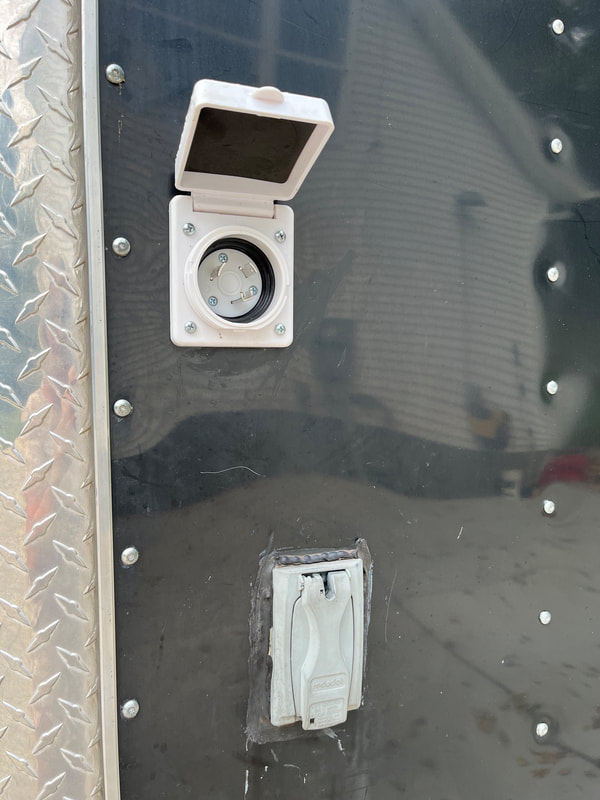
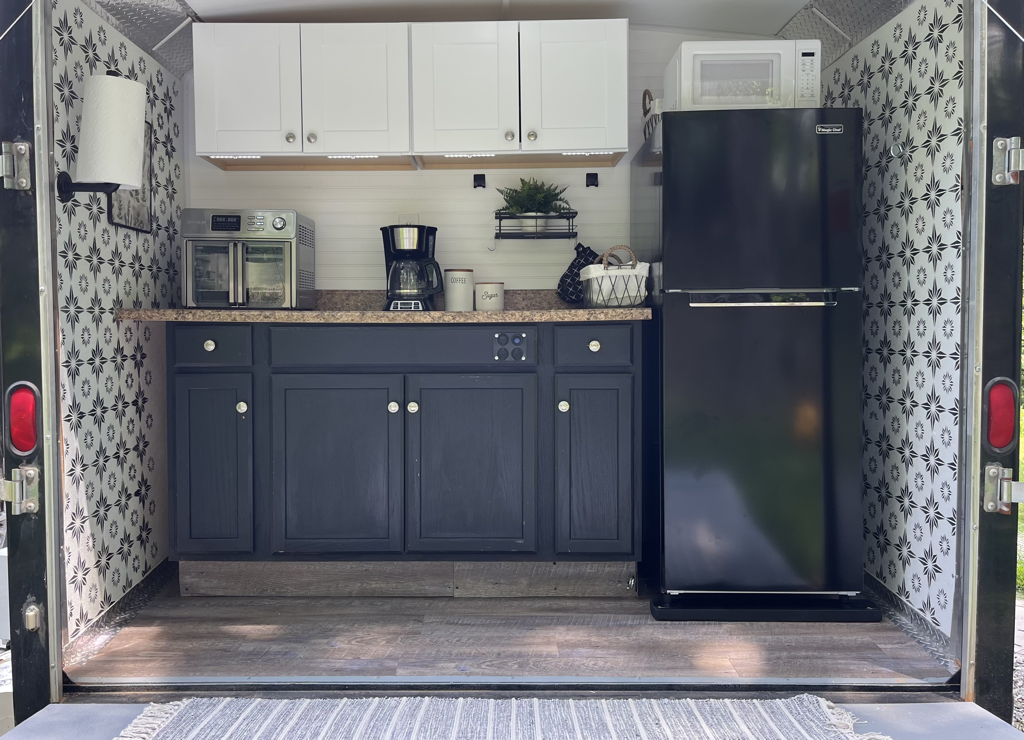
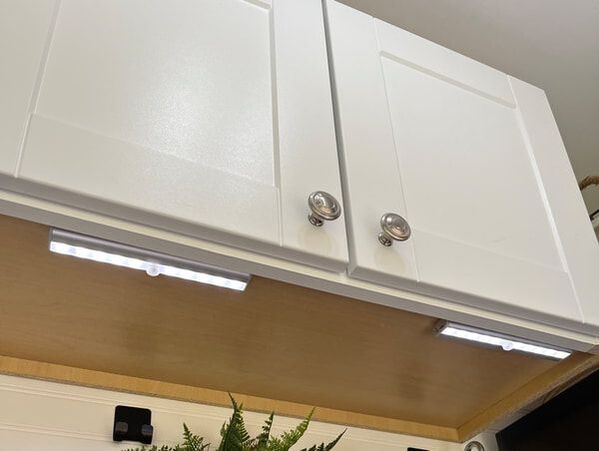
(There is a link at the end of this blog where you can find lots of the products we used) Sleeping QuartersWe then gutted the inside and gave it a good cleaning to get rid of the dirt bike fumes and residue. We repurposed the cabinets in the "outdoor" kitchen which you will see further down. We moved the inverter and ran new wiring to the back of the trailer which gave us outlets, and additional lighting. We also installed an exterior 30 AMP inlet.
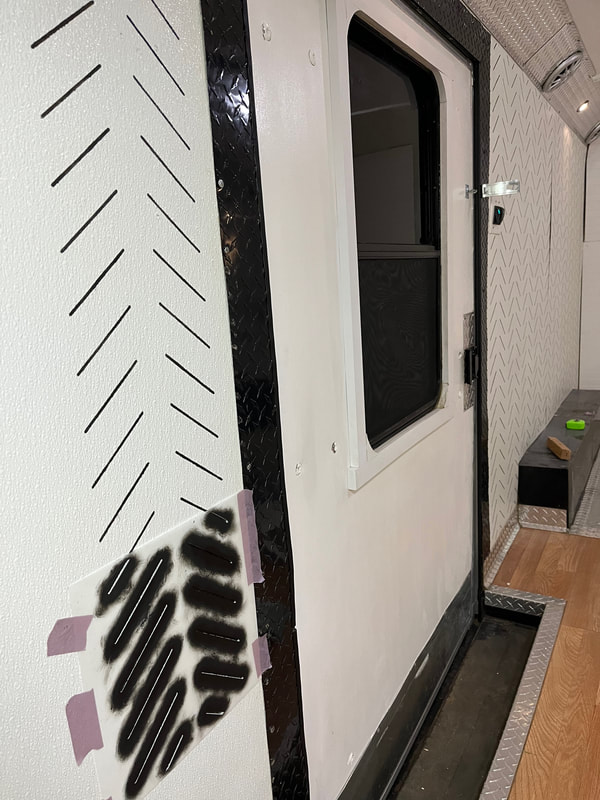
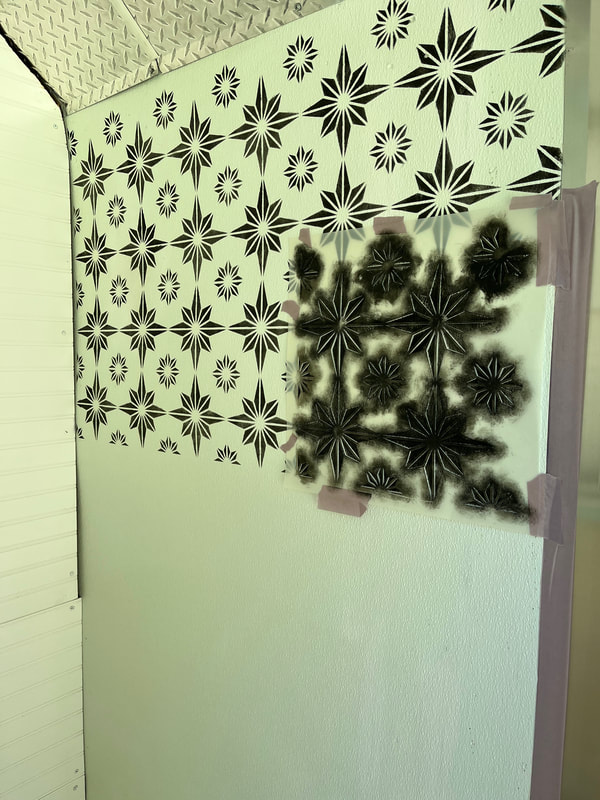
We ran the new wiring behind the diamond plate at the top of the wall. That was an easy way to hide the new wire! 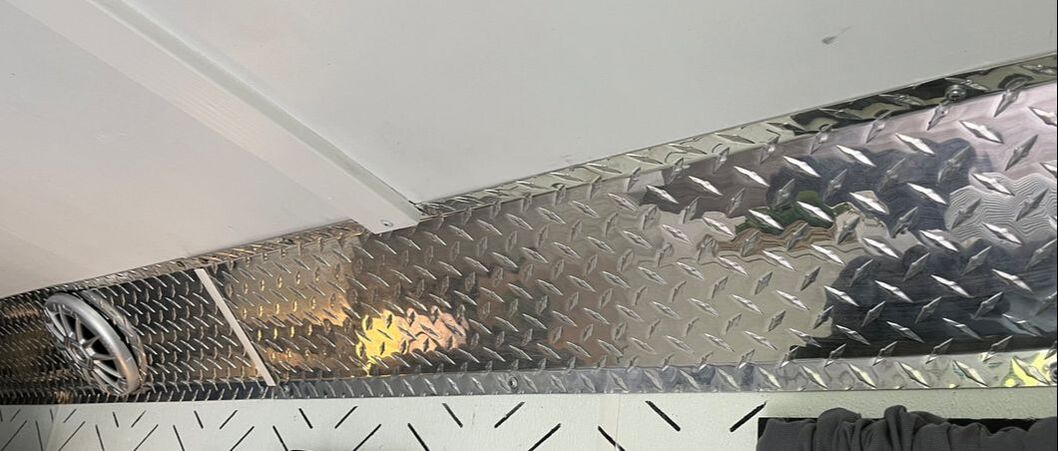 I wanted the kitchen to be located at the back of the trailer so that when the back door was pulled down, we would basically have an outdoor kitchen. To achieve this we built a wall 4' from the back of the trailer to separate the kitchen from the sleeping quarters. We nailed bead board to each side of the studs to serve as the wall. The ceiling is curved, so I made a template with brown craft paper to cut the top piece of beadboard. We also added short studs above that top 2x4 to give us something to nail the top bead board to. You can see those in the second picture below. 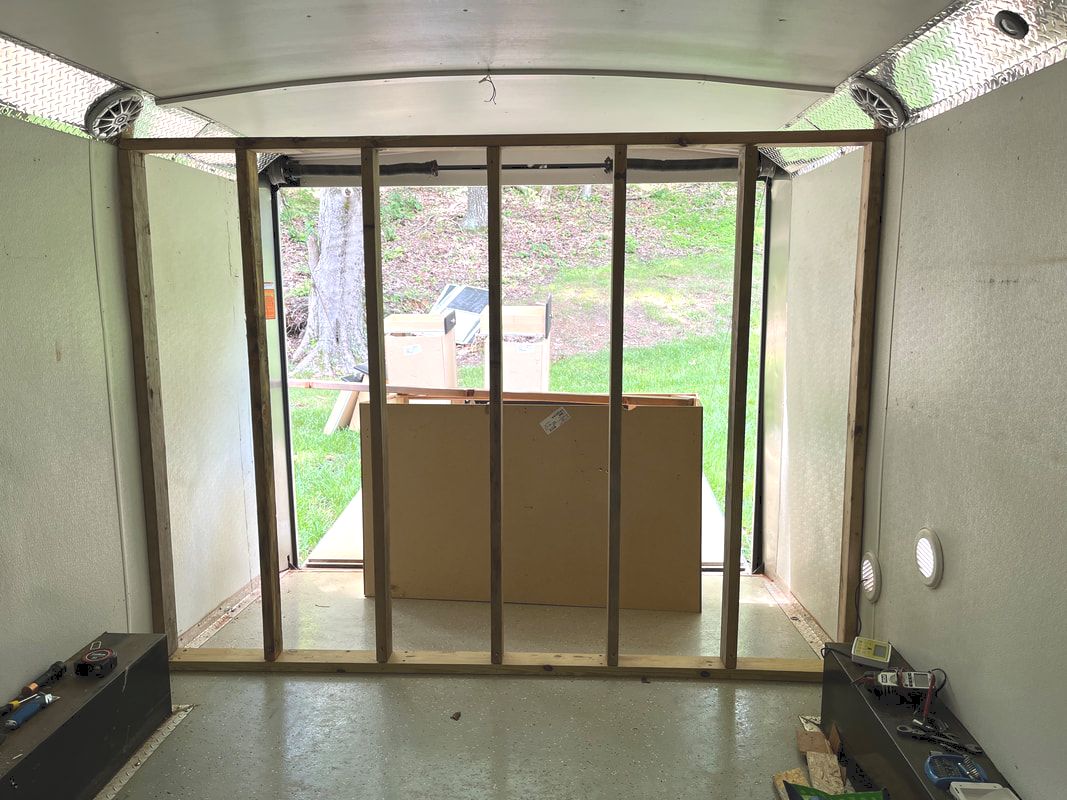 Studded wall attached to the floor and sides. 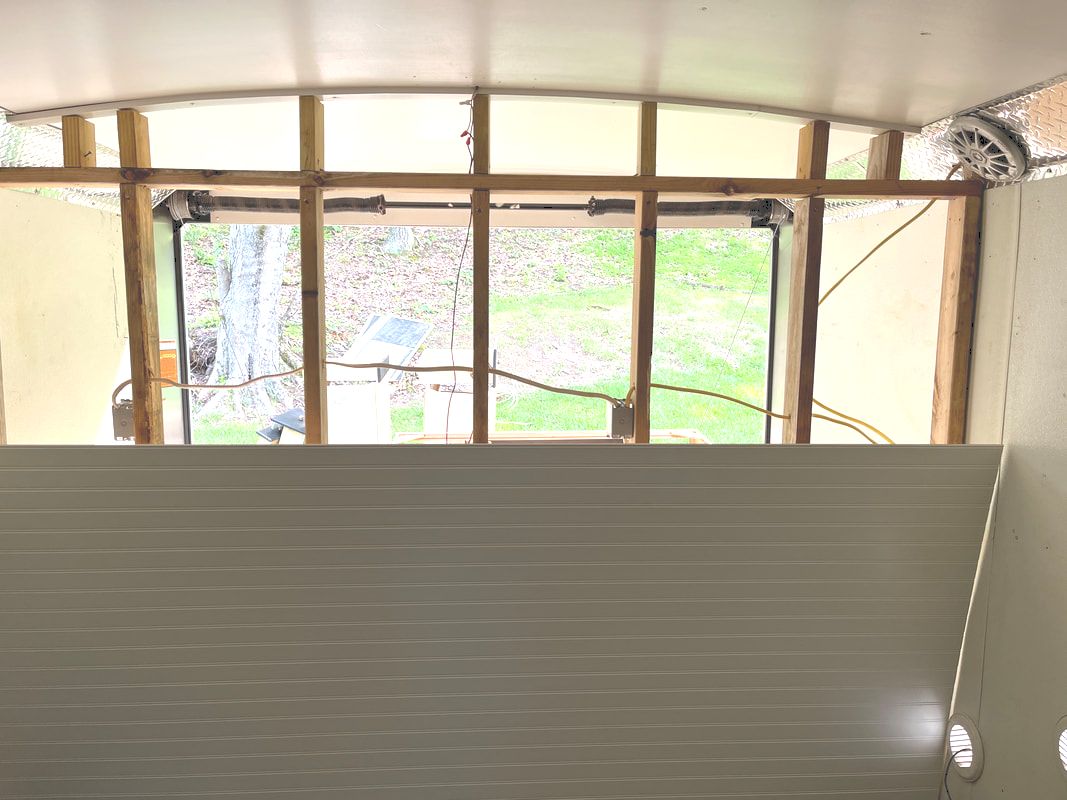 Bead board going up. Once the wall was built and wiring ran, it was now time to start making it pretty! I stenciled a simple pattern in the sleeping quarters and used a more intricate design in the kitchen. I used caulk strips to hide the gap between the new wall and sidewalls and ceiling.
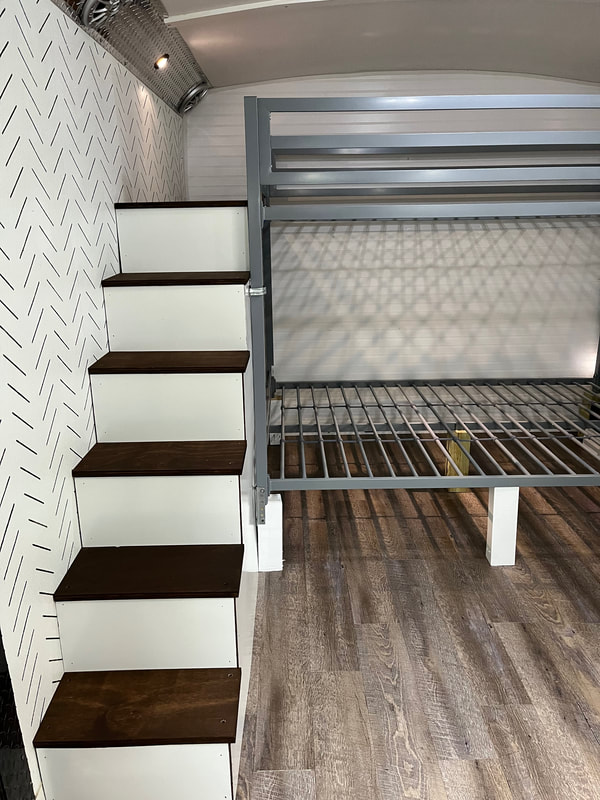
Next was ripping out the laminate flooring and replacing it with a peel and stick vinyl plank flooring. Then we added baseboard to give a finished look. 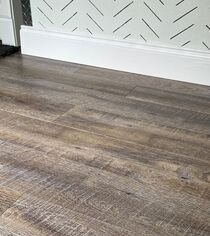 I ordered full over full bunk beds from Amazon. We had to raise them 11" because of the fender wells. This put the top bunk pretty close to the ceiling but it works. It is nice having that 11" under the bed for storage. I secured the bed to the steps, walls, and floor so that they would not move during travel. I figured out the size and rise of the steps to the top bunk (this really made my head hurt) and we cut out the stringers from 2x12's. I had some old shelving that I was able to use as the stair treads and then I used a 1/4" piece of wood as the risers. I also built shelves under the steps for additional storage.
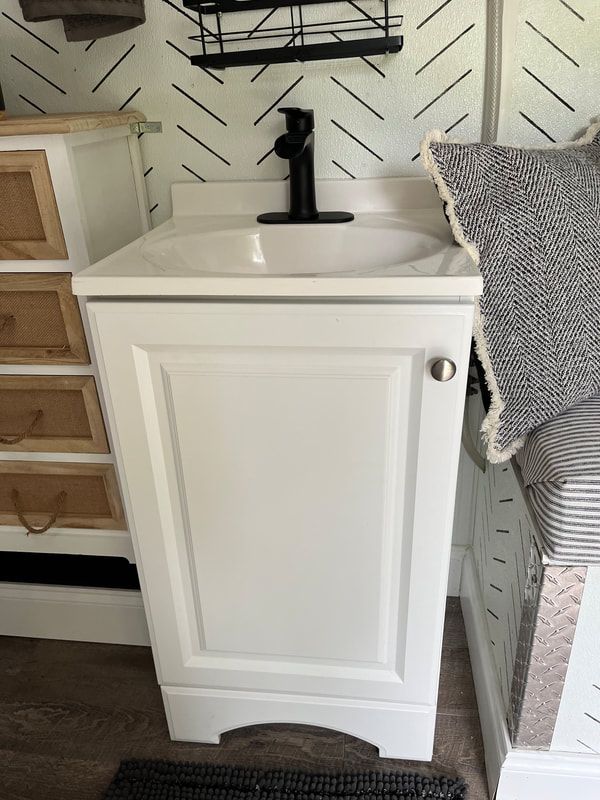
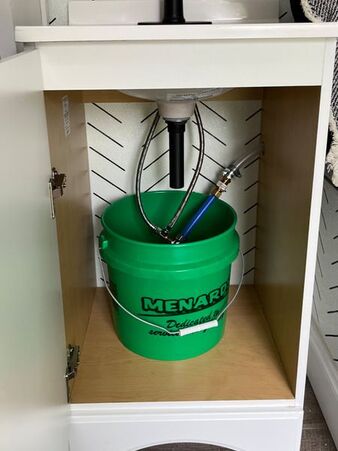
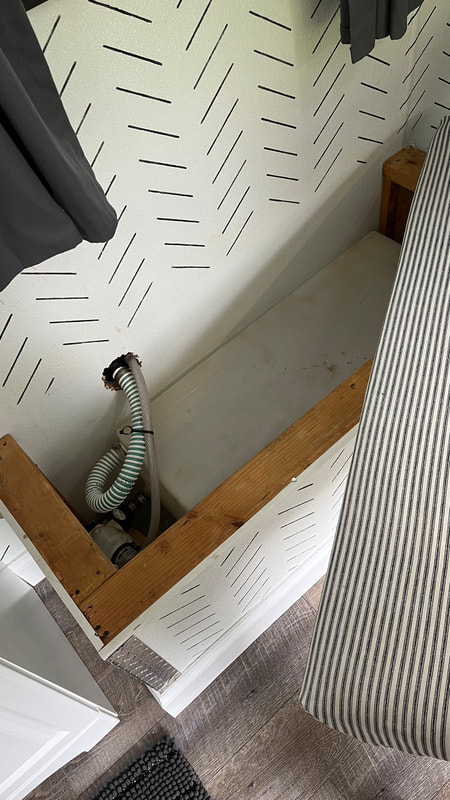
 We then installed a small sink and ran new plumbing from the water tank. Instead of cutting a hole in the floor and installing a gray water tank, we just put a bucket under the sink to catch the dirty water. Easy enough!
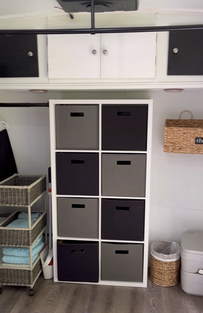
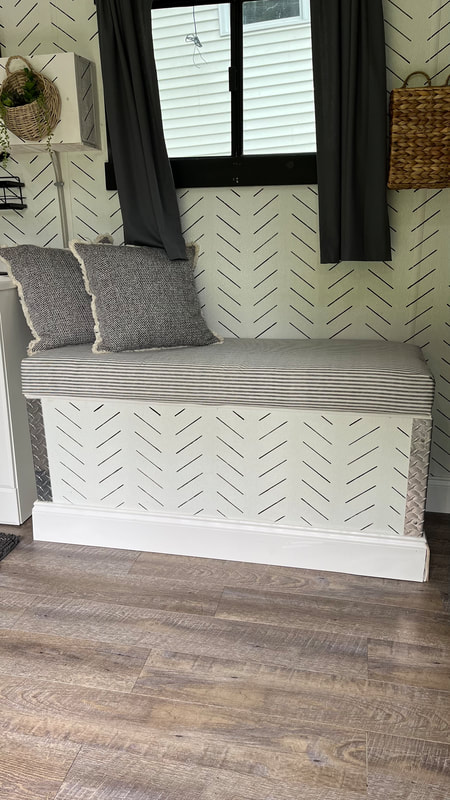
I fastened a set of storage cubes to the floor and front wall. I then added a rod on the left side to hang clothes. To the right of the cubes is where we put the porta potty. I then hung a curtain rod to lend a little privacy. I got a great deal of curtain panels at JC Penny. I cut them to the size needed for all the windows and used double sided fabric tape instead of actually sewing a new hem. The water tank is located under this bench. I covered the cushion with a heavy duck cloth fabric.
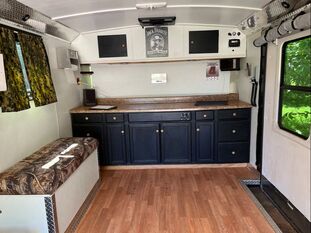
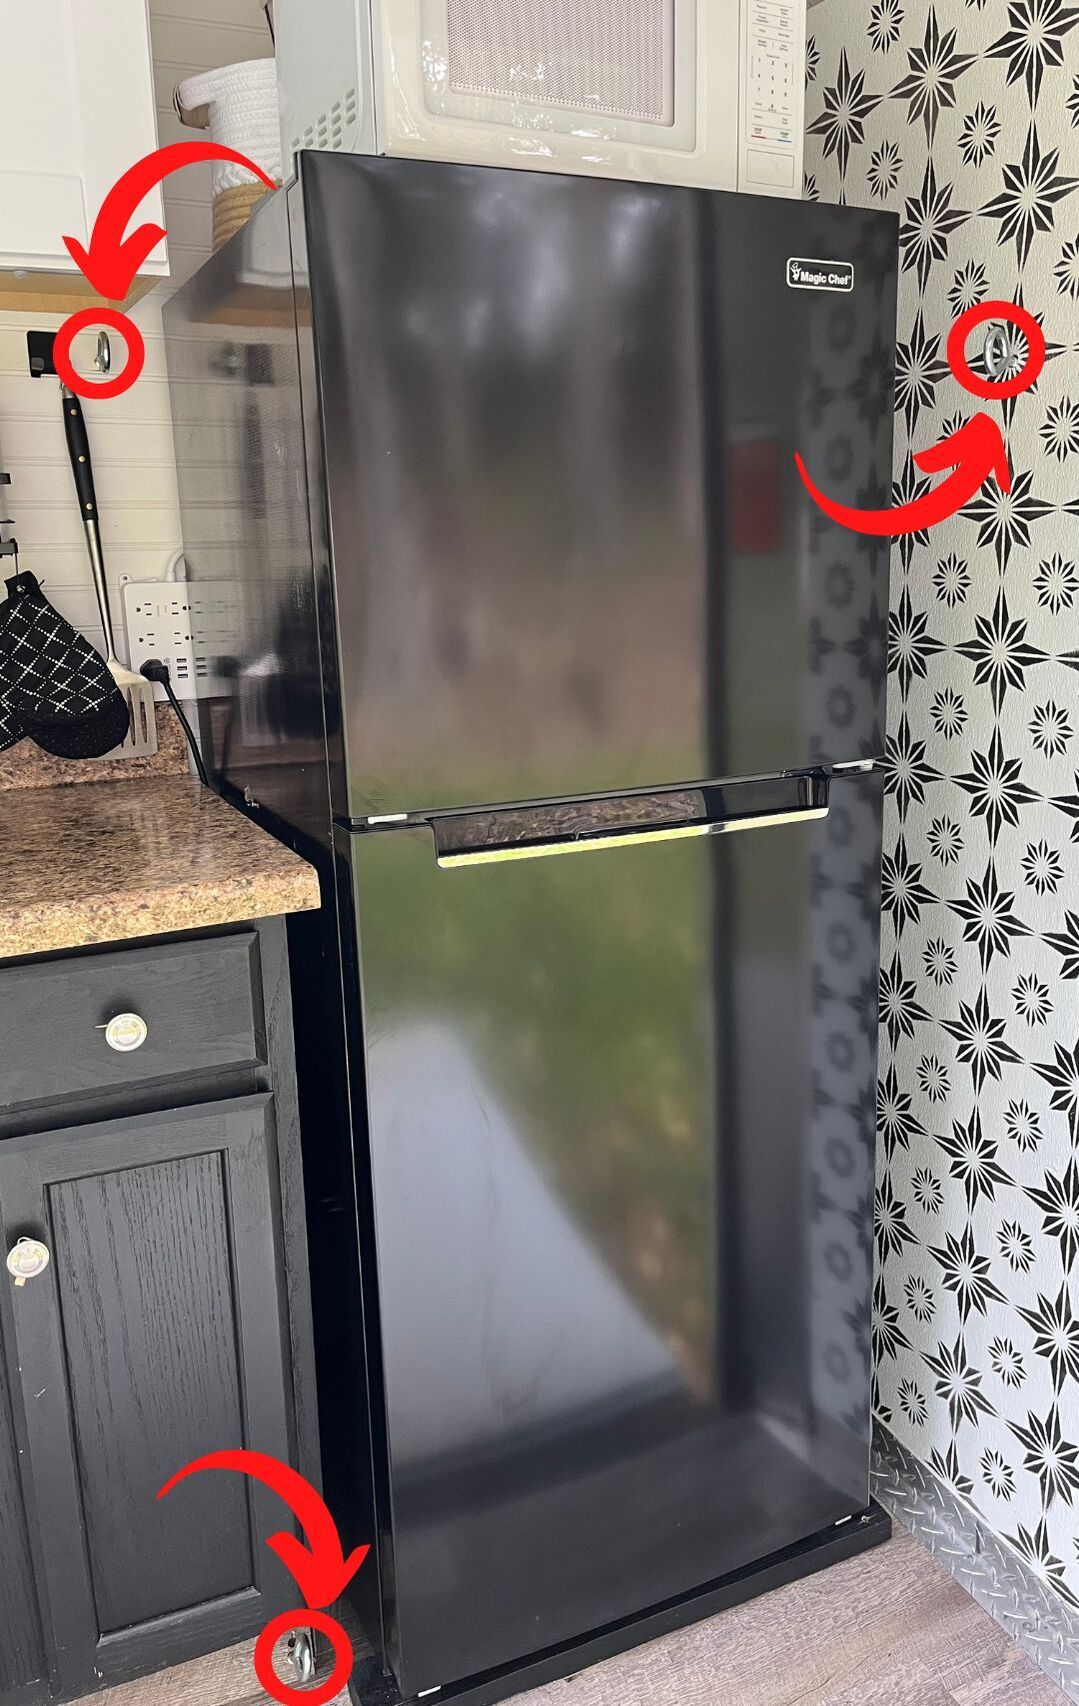
 All done and decked out! Outdoor KitchenWe repurposed the cabinets that we removed during the demo phase. We moved them to the kitchen area and screwed them to the floor and walls. We didn't use all of them so we had to cut down the size of the countertop. We bought 2 upper cabinets and secured those to the studded wall we built. We added 3 eye bolts to the studs around the fridge so that we could strap the fridge in place during travel.
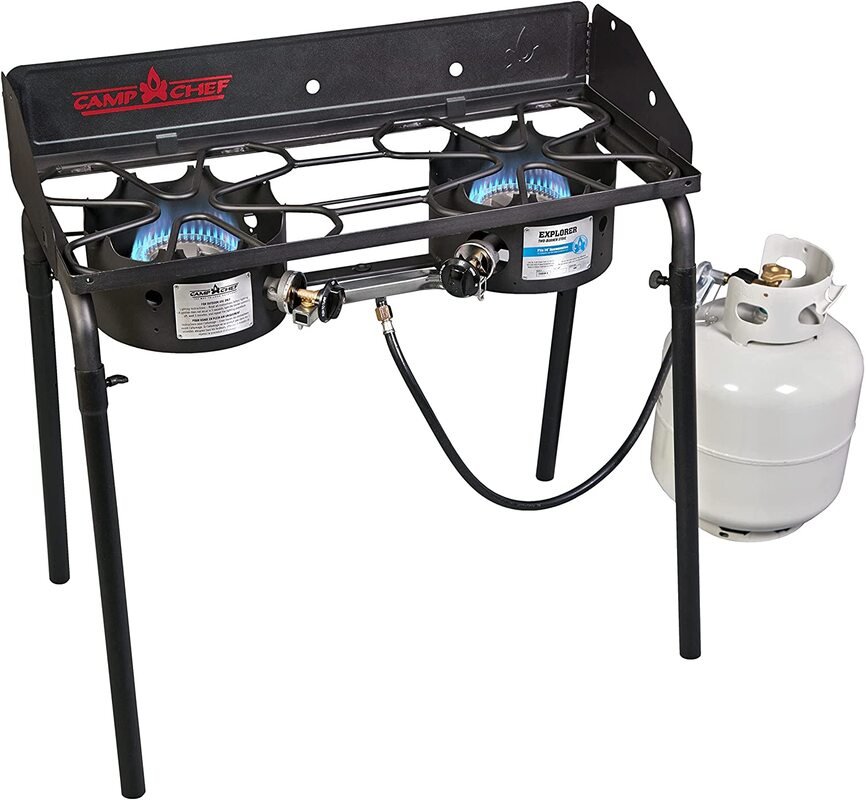
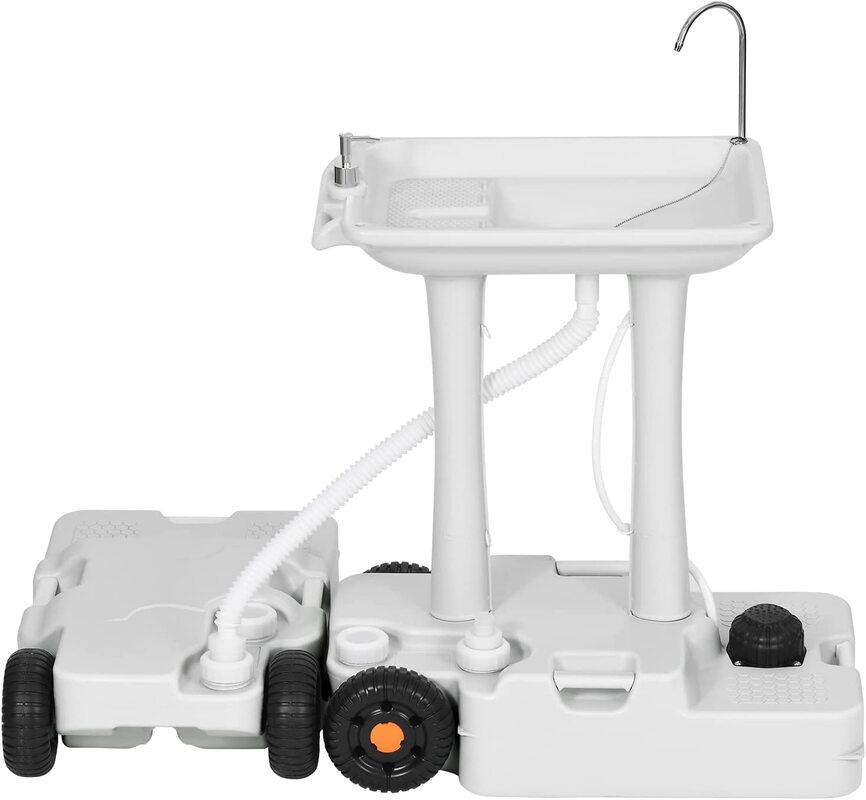
We left enough room to add an apartment size refrigerator. A larger fridge was a must for me. I put a convection/toaster oven on the counter and put the microwave on top of the fridge. We have a 2 burner Camp Chef stove which we set up outside for cooking. We also purchased an outdoor sink for washing up.
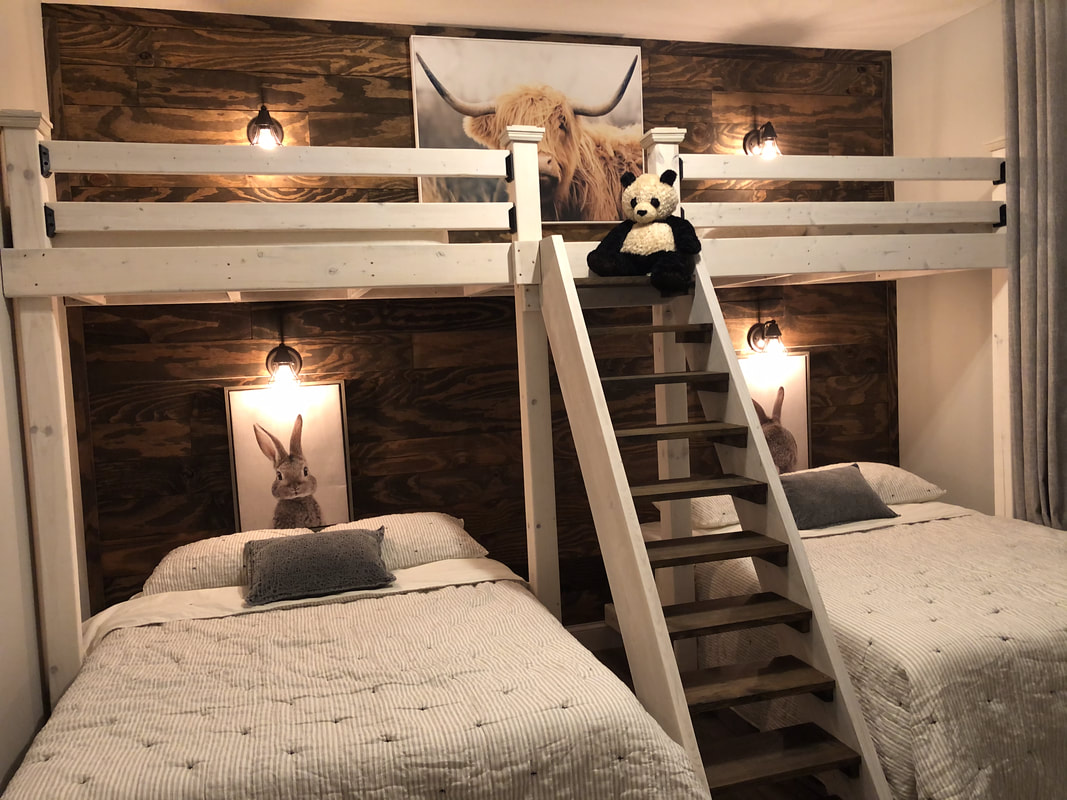
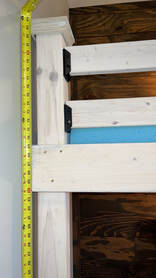
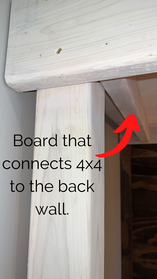
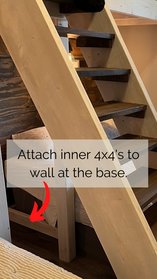
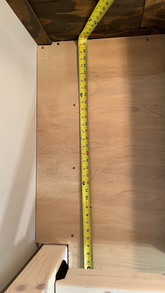
We are so happy with the final result of this project. We tailored the camper to our liking and it is so very comfortable. During our first camping trip, there was someone stopping by every single day to ask if they could look inside. I always promise not to include annoying ads in my blog posts. If you are interested in links to some of the products we used, click the button below. As an Amazon Associate I may earn a small commission at absolutely no extra cost to you.  Here is a quick tour of the finished camper. - till next time   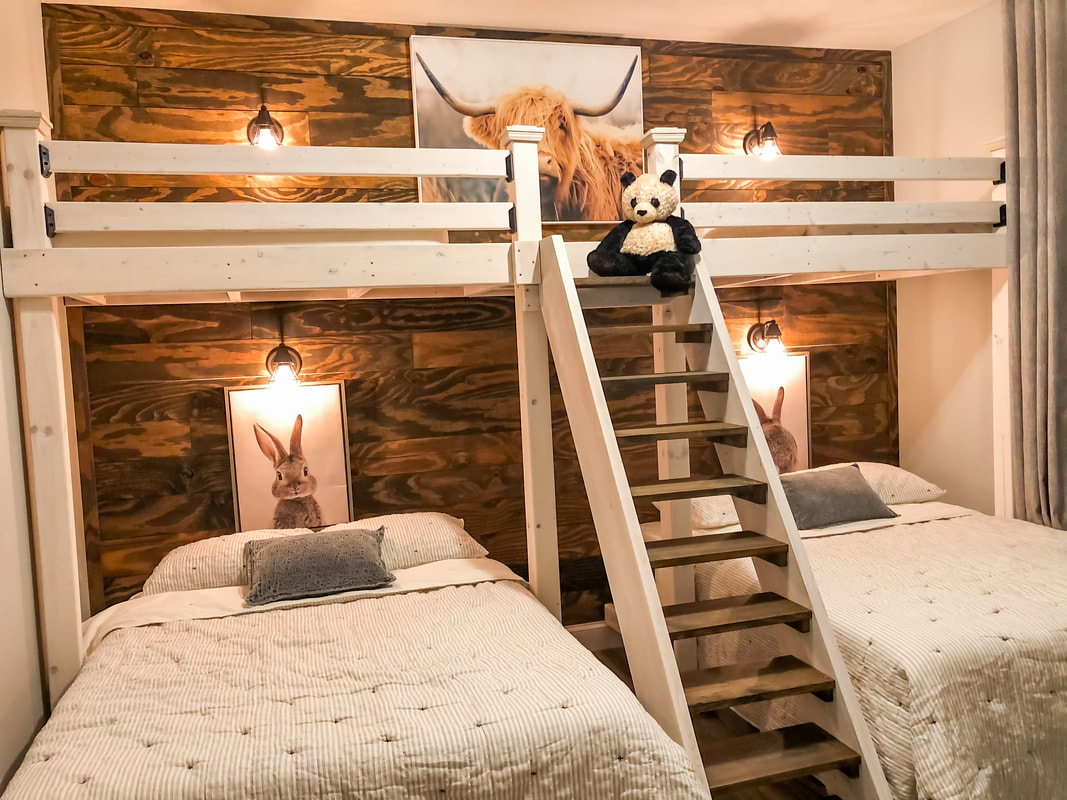 I've had quite a few people ask for blueprints of this loft bed that my husband and I built for our grandchildren. Unfortunately I do not have a plan on paper, it was all in my head. However, I will do my best to explain how we built it. I will also include a little video at the bottom of this post that may help. I wanted the loft to be the entire width of the room which is 174" and we made it 33" deep. I would have made it a twin size depth but I have a window in the way and 33" is as far as I could go. My ceilings are 9' tall and I determined that I wanted the bottom of the loft to be at 64", so we screwed a 2x4 at that height for the entire 174" (screwing into the studs of course). We then placed the 2 outer 4x4's 1" from the wall (to allow room for the cap on top) and screwed a 30-1/4" 2x4 to it and the long 2x4 on the back wall and also one at the bottom to keep the post level and sturdy.
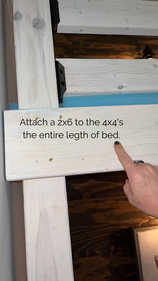
We then placed the 2 inner 4x4's in the middle at 17" apart, and screwed them to the back 2x4 as well, on top and bottom. We leveled everything as we went. The next step was attaching a 2x6 to the 4x4's the entire 174". Then screwed a 2x4" every 16" or so the entire length to create the joists. We added some additional support in the very middle where the stairs are.
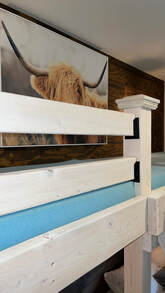
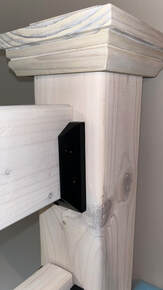
Now it's time for the loft platform. We took the measurements and cut 3/4" plywood to fit. You will have to notch around the 4x4's. Then screw the plywood to the joists. Next, using 2x4's, we added the rails. We attached them to the post by using these brackets that you can get at Amazon, Home Depot or Lowes. (link below) Top off the 4x4's with a little wood cap.
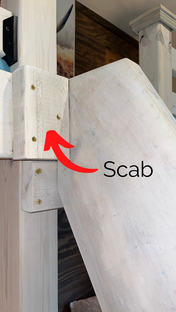
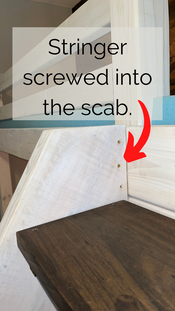
As an Amazon Associate I may earn a small commission at absolutely no extra cost to you. I did not want the stairs to extend past the full size beds on the floor so that's how I determined the length and angles for the stringers. I wish I could tell you exactly how I did it, but an engineer I am not! I think I just got lucky. The front of the stringer measures 81" top to bottom. At any rate, we had to add a little scab piece of wood onto the 2x6 to attach the stringer to.
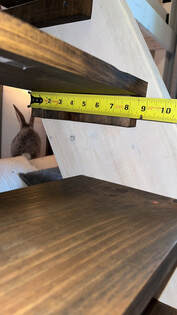
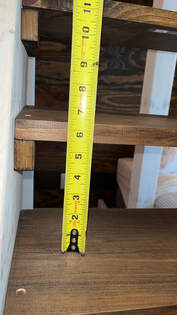
I then added the stair treads. I cut 2 pieces of wood at 2" x 8" to be used as the support for each stair tread. I made the treads 17" long x 8" wide and screwed them to the supports. I placed them 5 1/2" apart.
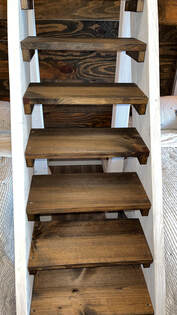
The final step was white washing the entire bed except for the stair treads which I stained. I mixed a flat white paint and water in equal parts. I simply brushed the mixture on the wood and immediately wiped it with a wet rag. That gave it a nice blonde look. The 2 full size beds under the loft are free standing and not attached at all. You could even swap one of these beds out for a crib if need be. I know this was long but it's the only way I knew of giving some instruction to the build for those that want to replicate it. Below is a little video that may be helpful. Comment below if you need further explanation. If you decide to give this project a go, I'd love to see photos of your completed build! -till next time  
I'm so excited to announce the publication of my very first book, Design Defined. My hope is that this book will help you see the differences in interior design styles. I give the key elements, characteristics, and inspiration photos that make up 11 different styles. I get right to point discussing color schemes, furniture lines, décor, lighting, and more. I include a mood board for each style with a link to my website where you can purchase or compare products for that particular style. This can be a very useful tool for those who need a little help. As usual, I don't rattle on and on or overload you with info that isn't really important.
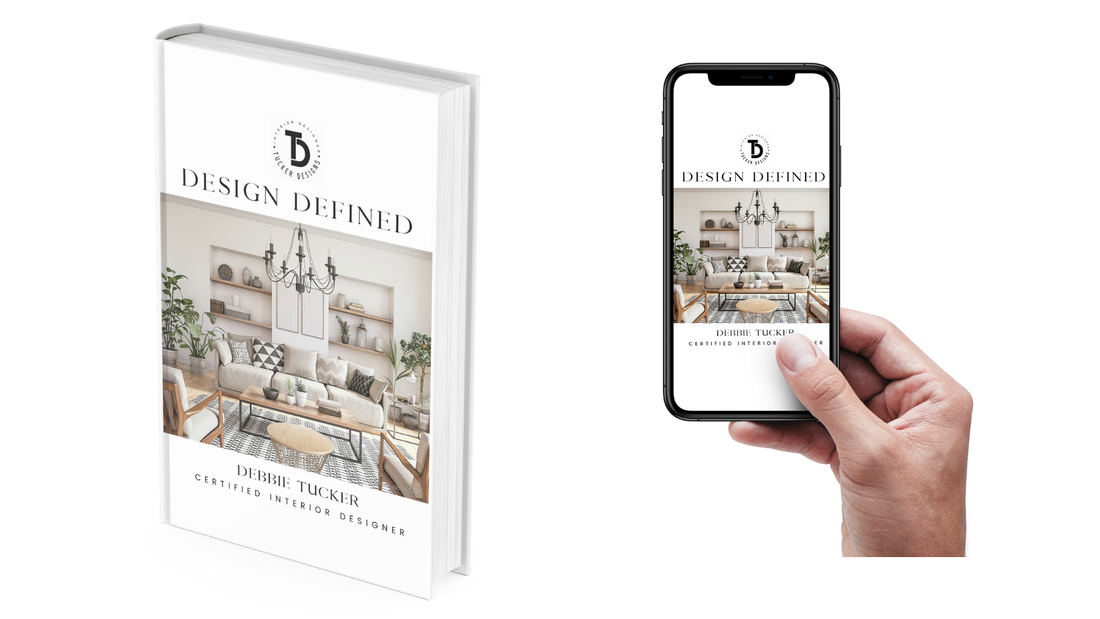
My book is available in eBook format and hardback. The hardback version also makes a lovely coffee table book or gift. Both versions are available for purchase on Amazon, a link is below.
As an Amazon Associate I may earn a small commission on qualifying purchases at absolutely no extra cost to you.
The interior design styles that I cover are:
Transitional Modern Boho Southwestern Modern Victorian Mid Century Modern Traditional Craftsman Modern Nursery Minimalist Modern Farmhouse 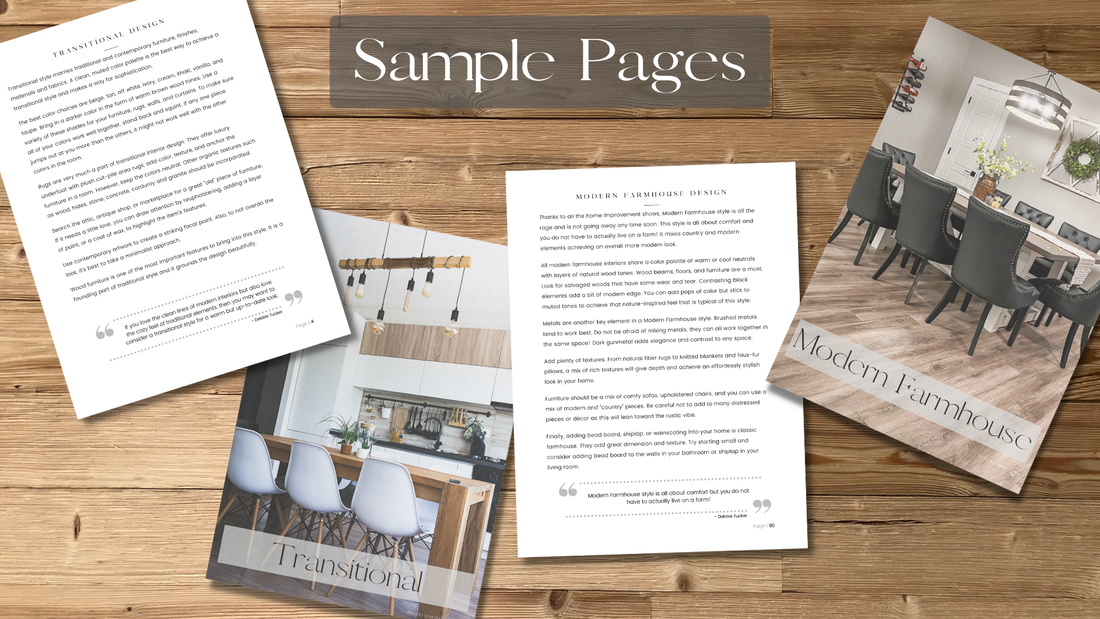
Amazon also gives you a "look inside" sneak peek.
I hope you will find this book helpful on your design journey and possibly save you money by not having to hire an interior decorator.
-till next time

A common problem with barn doors is that they will not stay shut or open. If they are slightly out of level, they will move on their own. That was my problem but I discovered an easy fix! You only need 2 items: little felt pads and gorilla glue. 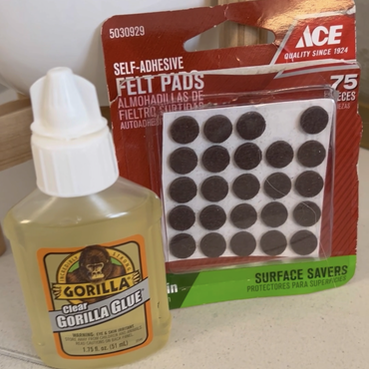 Put a dab of Gorilla Glue on your felt pad and stick it on your top rail (you'll need to determine the best spot for it which is about and inch from the wheel when it's pulled completely open). 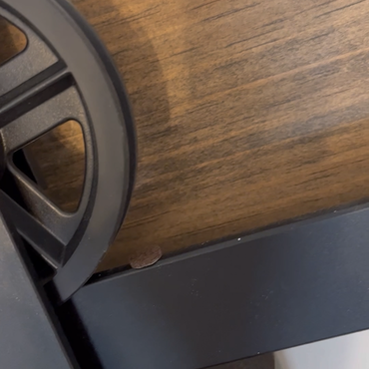 Now just wait for it to dry and that little pad will do the job! Watch the video below to see how well it works. As an Amazon Associate I will earn a commission on qualifying purchases at absolutely no extra cost to you. More info here.
Good luck and let me know if it works for you. - till next time  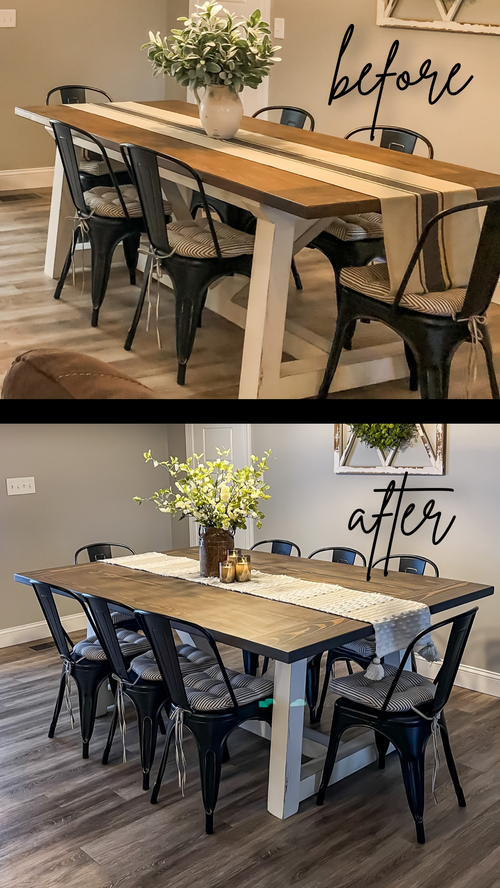 My brother built this table for me about 2 years ago. I recently decided to make it wider to accommodate more seating. I removed the tabletop from the base and took it to their woodshop - Cobb Brothers Woodworking, and then the process began. There is a video of the whole process at the bottom of this post.  I wanted to add about 16" to the width of the table. So, Dwayne brought out the circular saw and went to work cutting up that beautiful tabletop to make room for the new boards. He cut off each end and then split it length wise. 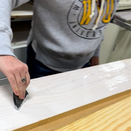 Since we no longer had any of the thick pine boards that we originally used, we had to glue up the pine he had in his stockpile. We used kiln dried yellow pine and planed it down to the right thickness. We then glued them up and waited for them to dry. 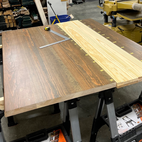 The next step was to plane the boards again to ensure they were completely flat and the same thickness. We then placed the new boards between the old ones and marked where the dominos would go and went to work creating the holes with a Festools Domino Joiner. 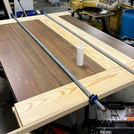 After that it was a matter of lining up the dominos, gluing, and clamping all the new boards together. After the glue had dried he trimmed off the excess with the circular saw and used the router to put a nice finished edge around the entire table. 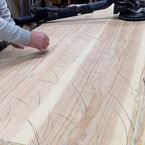 Now it's time to sand, sand, sand, and then sand some more. Just when I thought it was done, Dwayne took a pencil and scribbled all over the top. This way when the markings are gone, you know you have a good smooth finish. This is NOT my thing, I am not patient and you need to have patience in order to do a good job. 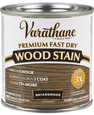 Once the sanding was complete, I wiped the table down with a tack-cloth and applied a coat of stain. I used Briarsmoke by Varathane, it has a nice gray-brown tone. After that was dry we sprayed it with a coat of clear vinyl. I then applied a coat of wax and it was ready to reunite with the base! 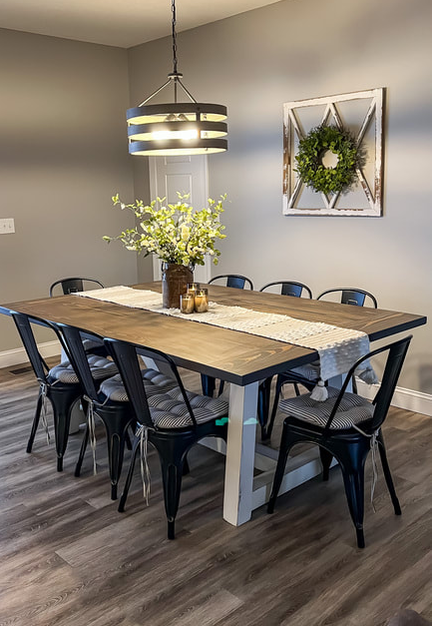 I am so so pleased with how it turned out. A HUGE thank you to my brothers, Dwayne & Rick who made it happen. If you live in or near West Virginia and are looking for custom cabinetry or furniture, look no more - they are the best!! Just message me and I will give you their contact info. Here is that video I told you about! Don't hesitate to message me with any questions. - till next time   Are you looking for an easy way to display your family photos? I have an easy and inexpensive solution for you! You can make this project in a weekend. The good news - you can easily change the photos as your family "grows". 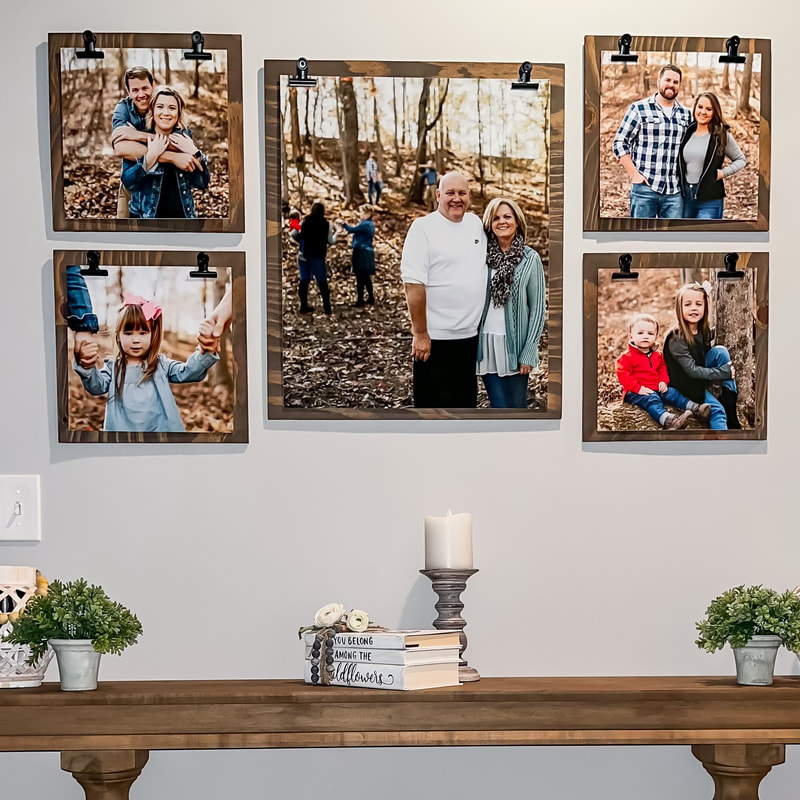 This page may contain affiliate links which means I may receive a commission for purchases made through links. Learn more on my Private Policy page. List of materials:
Next have your boards cut 2" wider and 2" longer than your photo sizes. Sand them really well with sandpaper. Wipe the dust off and then stain them. After they have dried, screw your bulldog clips to the top of each board, evenly spaced. Then attach sawtooth hangers to the back. Now you are ready to attach your photos with the bulldog clips and hang them on the wall. Stand back and enjoy! Below is a video of the entire process. - till next time 
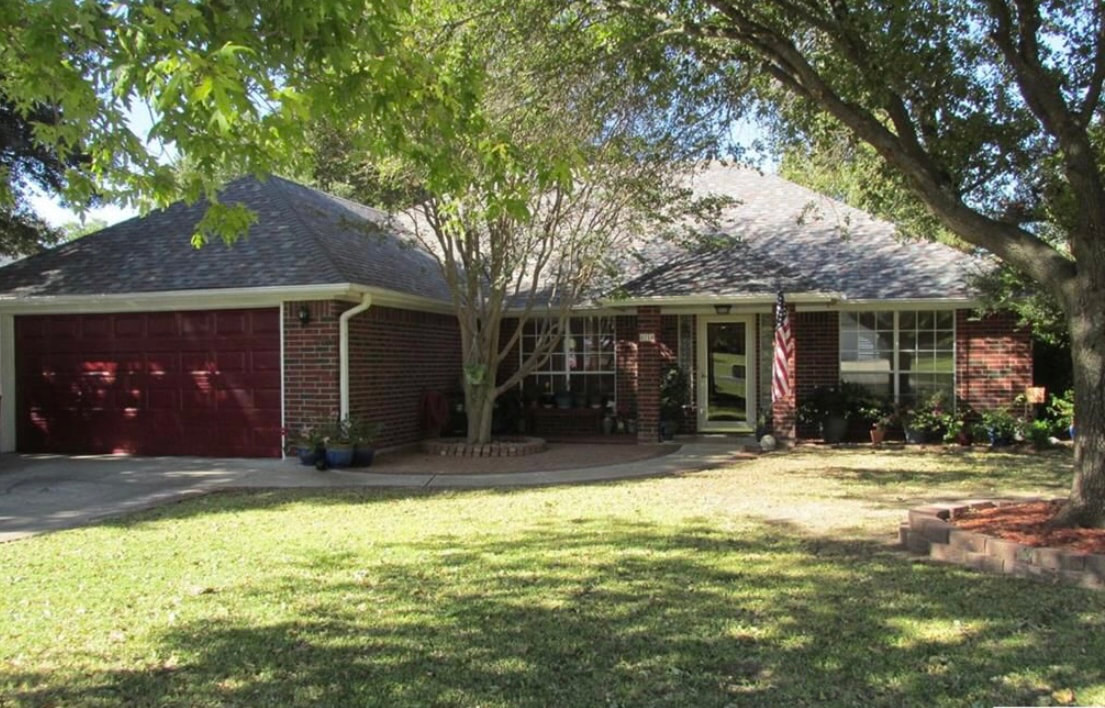
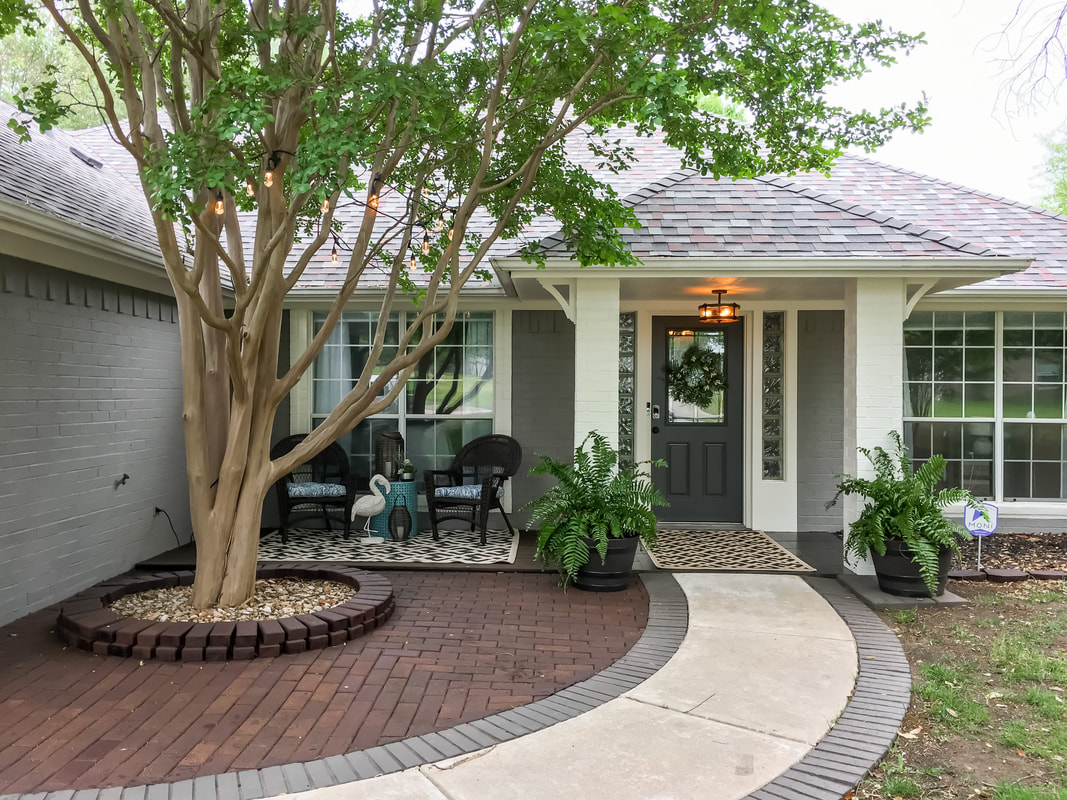
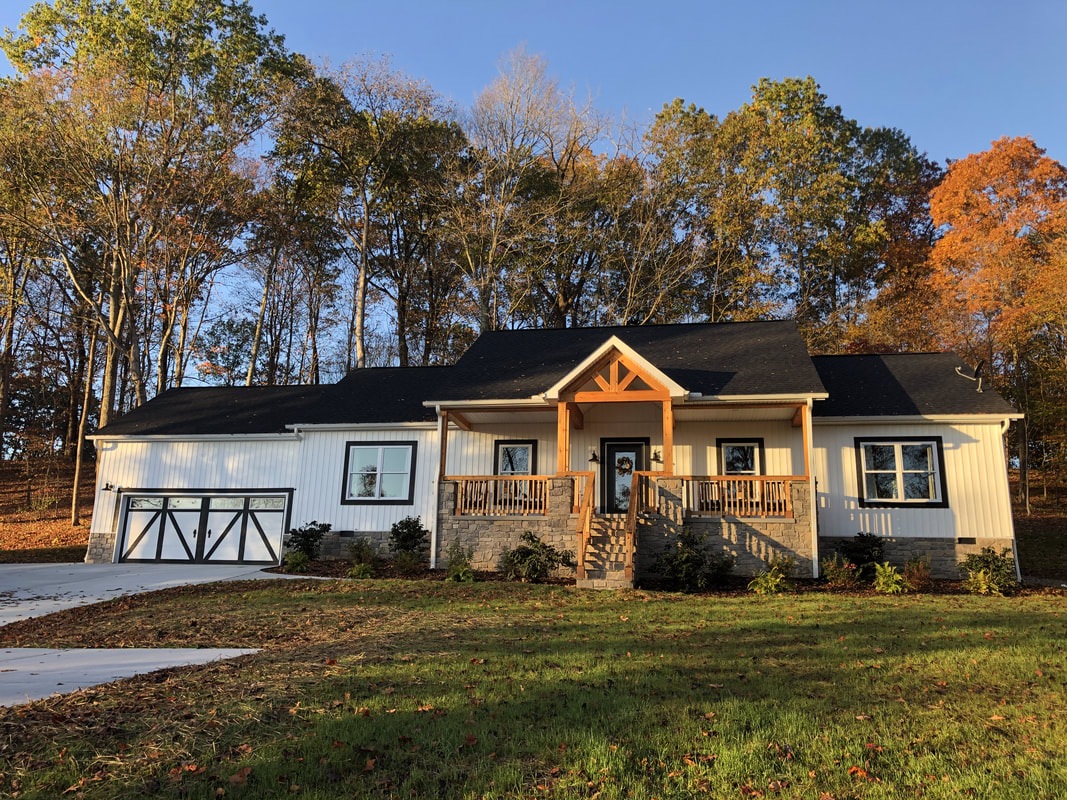
This house was lacking curb appeal. It was really well built and only need a few changes to make it really stand out. This is the before photo, you can see that it almost disappears in the trees.
We encased the brick columns with wood and also added wood trim around the door sidelites as well as the garage door. We then put a coat of masonry primer on the house, tinted the same color as the topcoat. Tinting the primer is a game changer, it only took one coat of paint by doing this. The primer wasn't exactly the same as the topcoat because the primer base is different, but it was very close. We then painted the brick around the windows and all the wood with a light cream color. We replaced the front door with a half glass door to allow more natural light into the home. I painted it dark gray. We replaced all the lights with more modern fixtures. I stained the brick on the ground in front of the house, added some chairs and plants, and there you go!
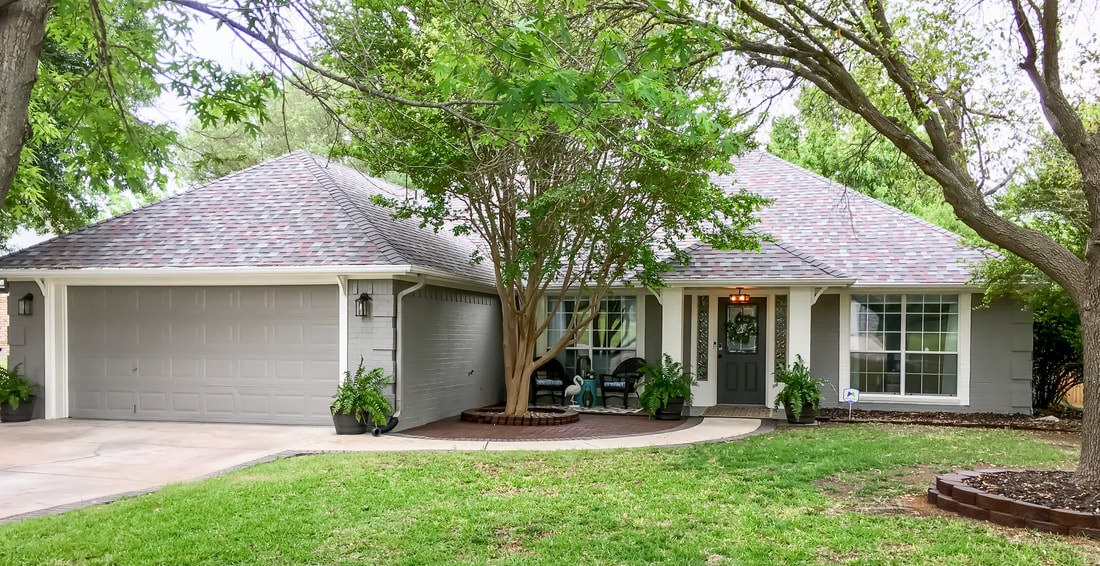
What a difference these few changes made! We had around $600 in the entire project and some good sweat equity. It now really stands out and is the cutest house on the block.
I hope this inspires you to take a look at your home's exterior and see if you too can add curb appeal with just a few changes. If you need help just send me a picture of your home and we'll talk about it.
- till next time 
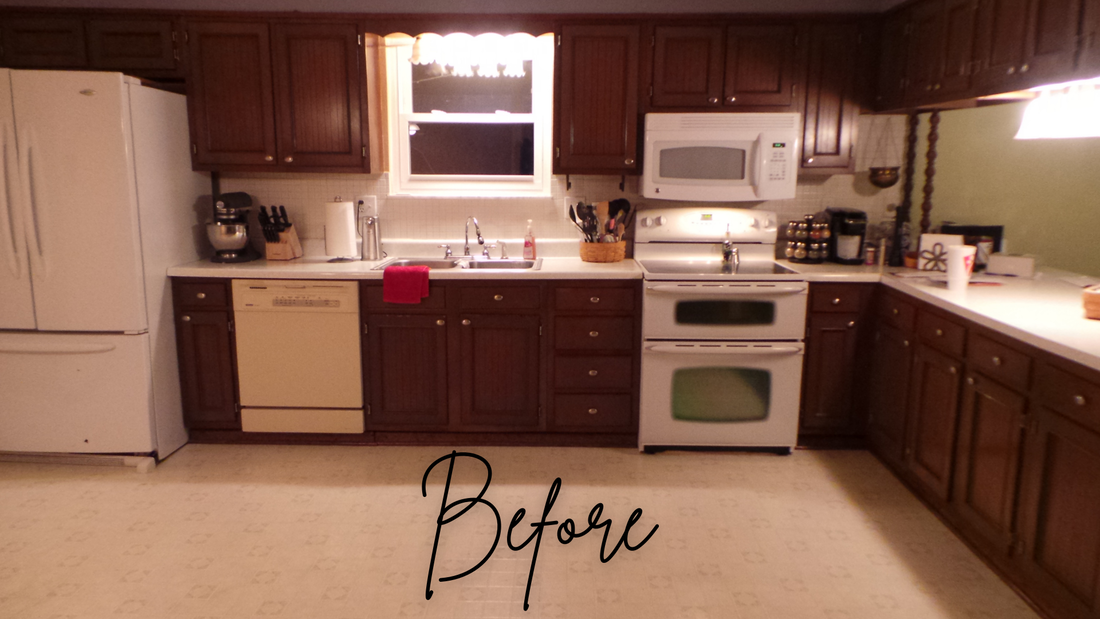
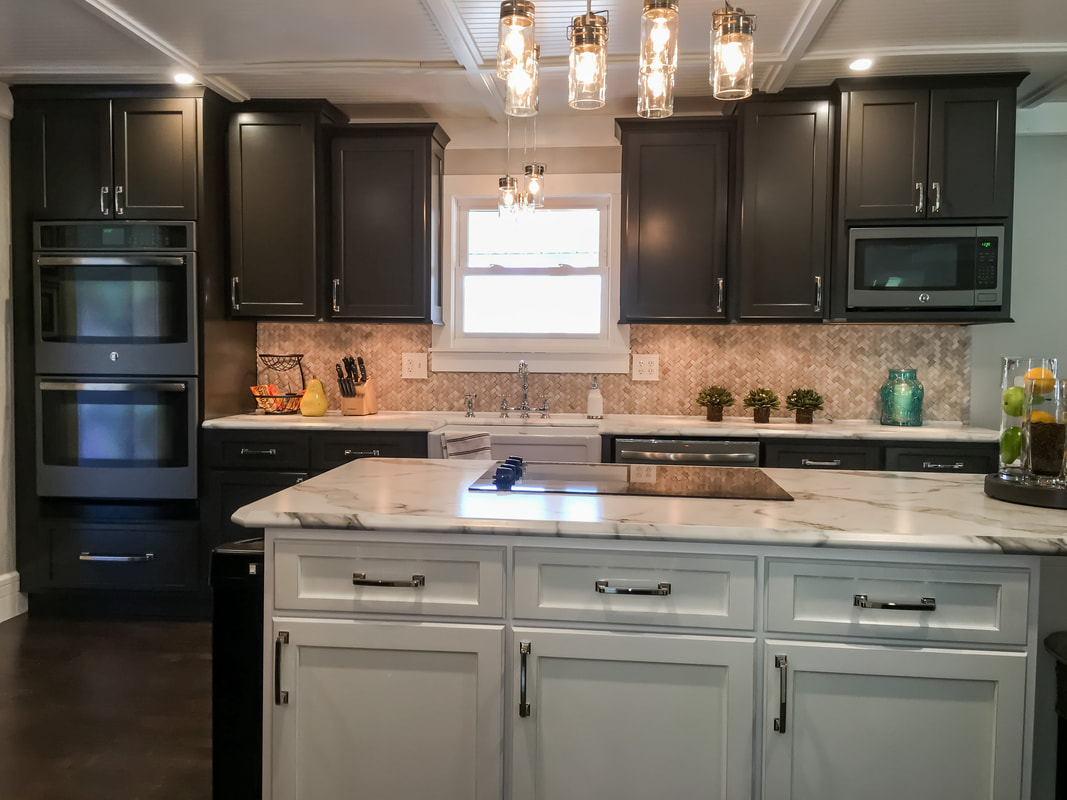
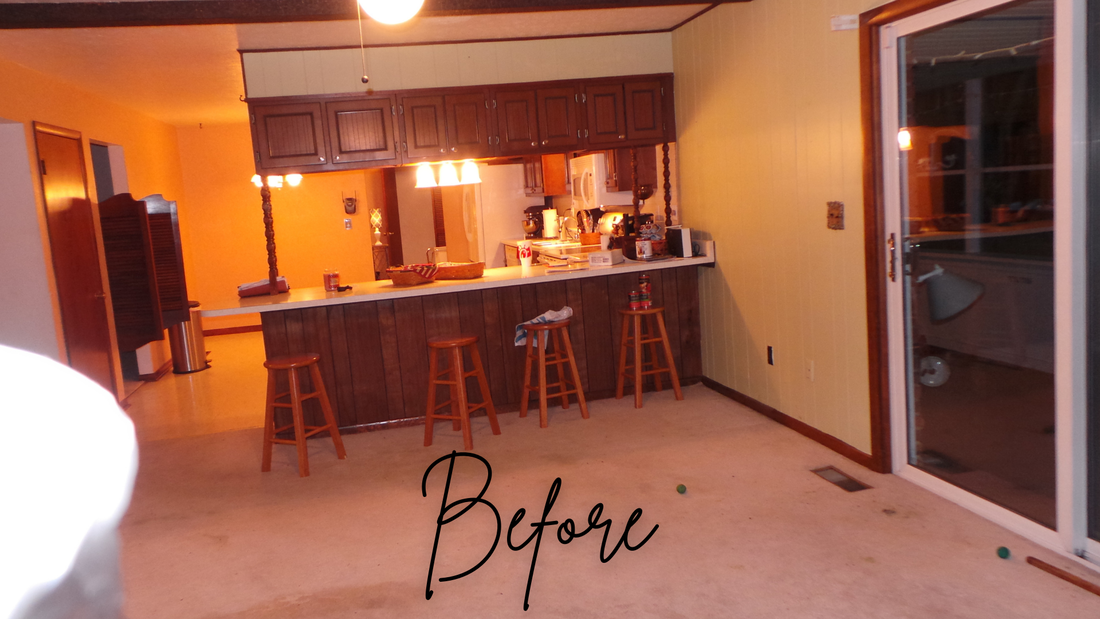
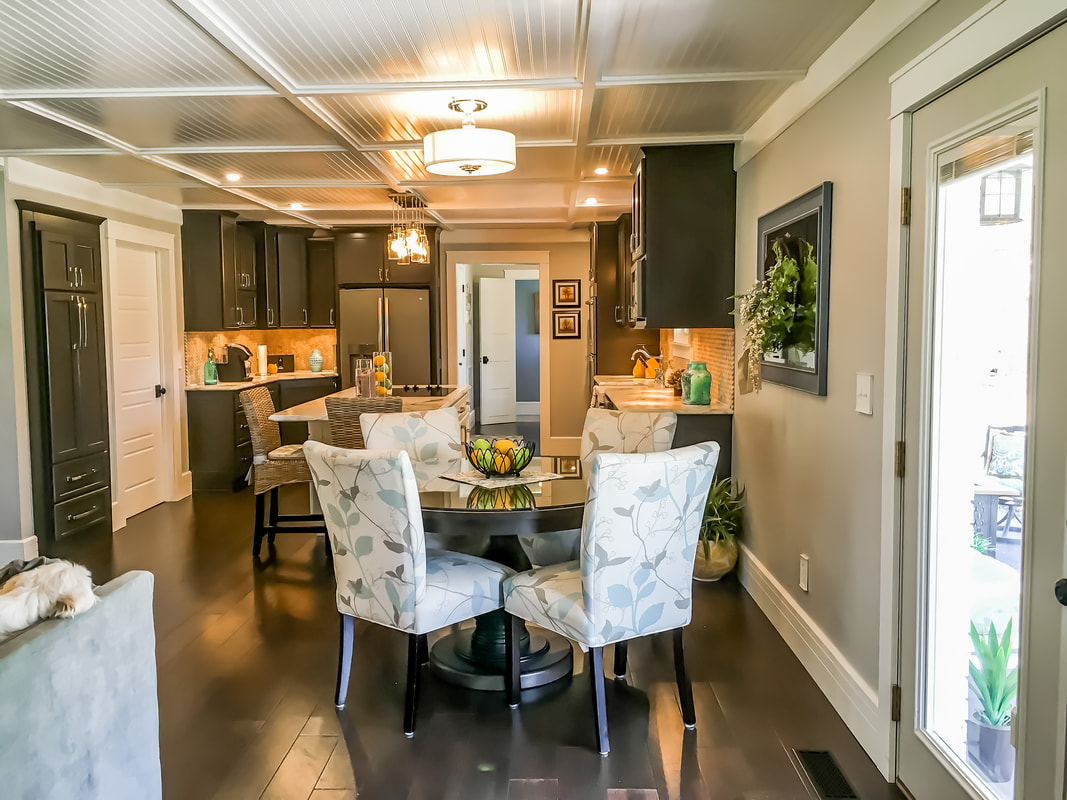
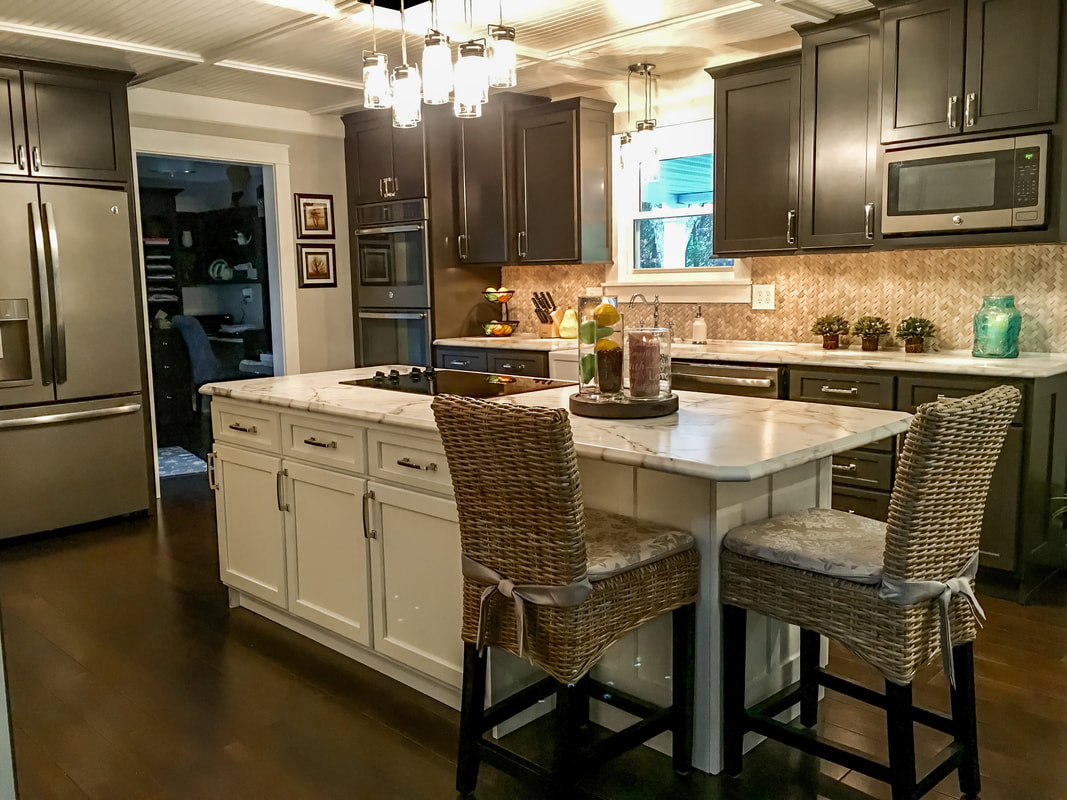
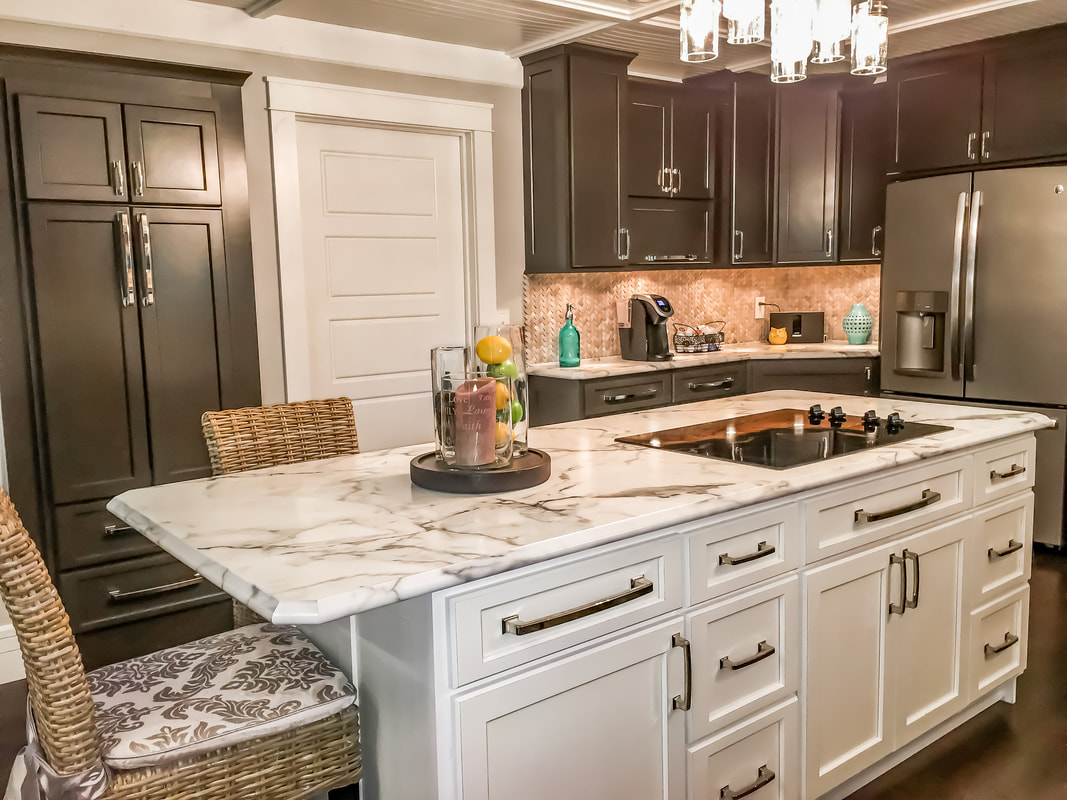
This beautiful kitchen did not look anything like this when I first got my hands on it. It was an L-Shaped kitchen with a peninsula and cabinets above it, very popular in the 60's but not ideal for sure. See the before pictures below.
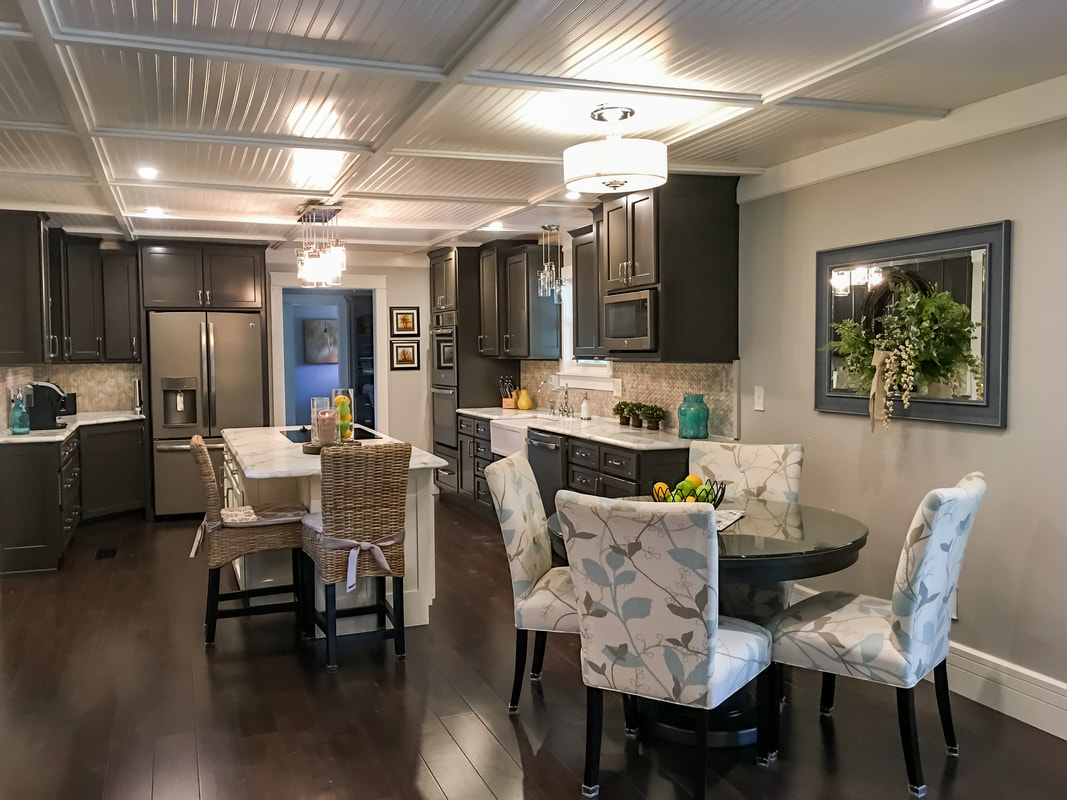
We ripped everything out and started over. I used a rich dark brown on the cabinets and chunky chrome hardware. The island was a great addition to this kitchen and really tied everything together. The countertops are actually Formica. Everyone thought it was real Calcutta marble. It was a fraction of the cost of marble. I installed a farm sink and carved out a spot in the cabinets for the microwave.
So Bad!

I redesigned the kitchen to be U-Shaped. I sunk the fridge into the garage a few feet so that it would be flush with the cabinets. I added cabinets along the left hand side where the kitchen table used to sit. I also added bead board on the ceiling and trimmed it out into 4' squares. It was stunning.
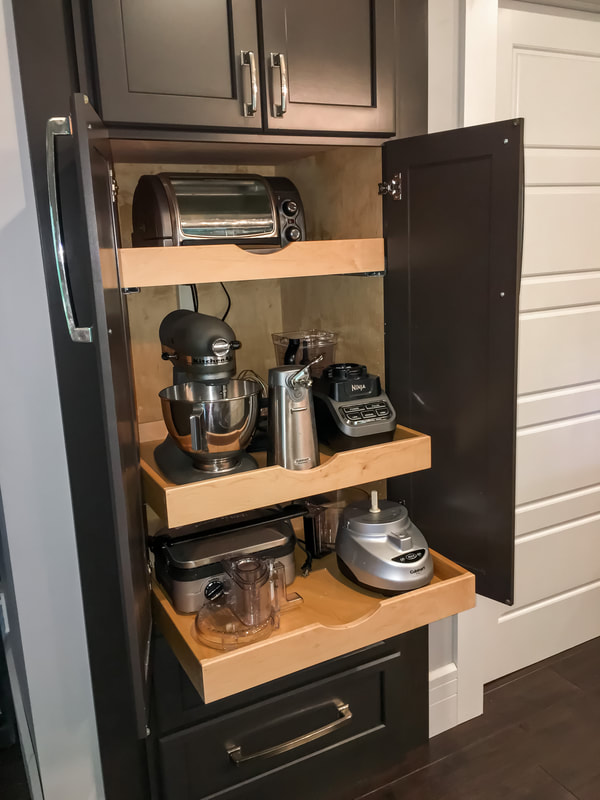
I utilized the space under the stairs and turned it into a small appliance cabinet. I had an electric strip installed in the back of the cabinet so all the appliances could remain plugged in and ready to use. All the shelves were pull outs which made it very functional.
Install day was so exciting! My very talented brothers (Cobb Bothers Wood Working) custom built this kitchen. They also made the countertops. If you live in or around West Virginia and need a kitchen, you WANT to hire them. They do top notch work. Contact me and I'll send you their information.
GETTING CLOSER!

I could not have been more pleased with the outcome of this kitchen remodel. It was beautiful and way more functional than the original kitchen layout.
Kitchen remodels can be very costly, so you want to make sure that you start with a solid design and include all the elements that will function well for you. If you need help with your project feel free to reach out to me.
- till next time 
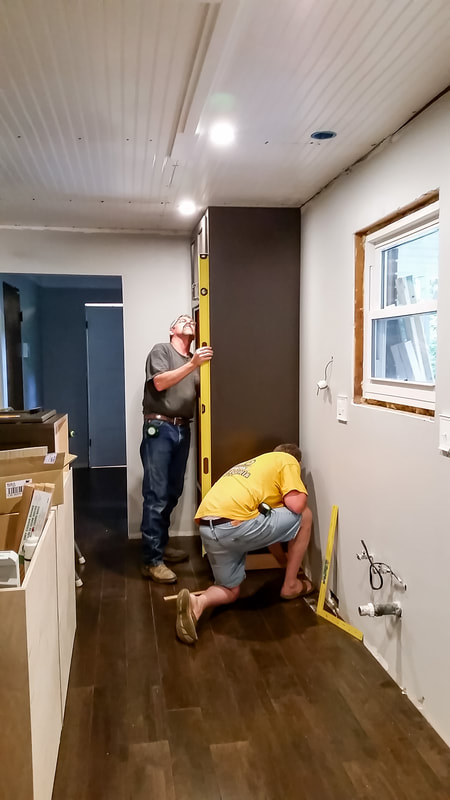
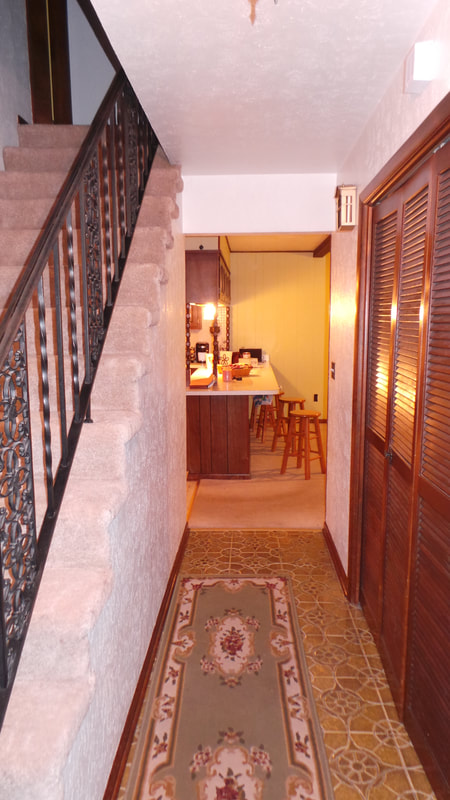
This entry was closed off and cave-like. You could barely get a mattress and furniture up the stairs because it was so tight. There was also outdoor iron railing for the stair rails. The flooring screamed 1960's. All of this had to go! Just look at the photo below. (I'll address the kitchen in another post.)
The demo included removing the railing, removing the small bedroom that was above the entry to make a grander entry, removing the coat and electrical closet, and taking down all the walls to make an open concept.
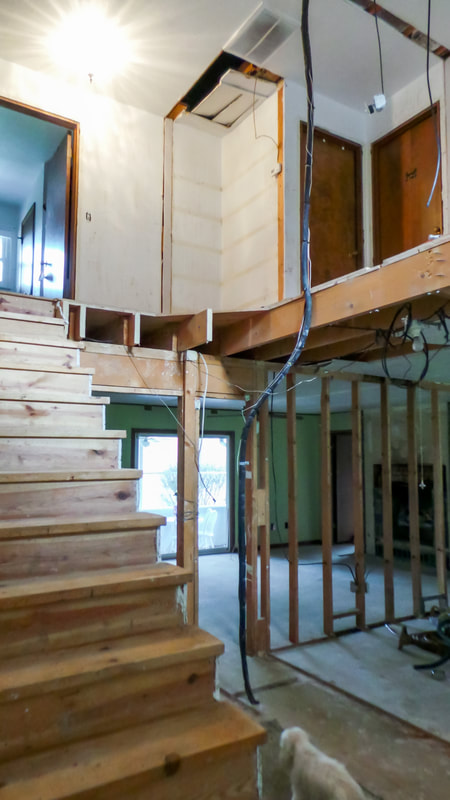
We had to install a beam to carry the weight of that supporting wall downstairs. Those studs came out eventually. This was a huge undertaking but the results were so worth the hard work. Just look below!
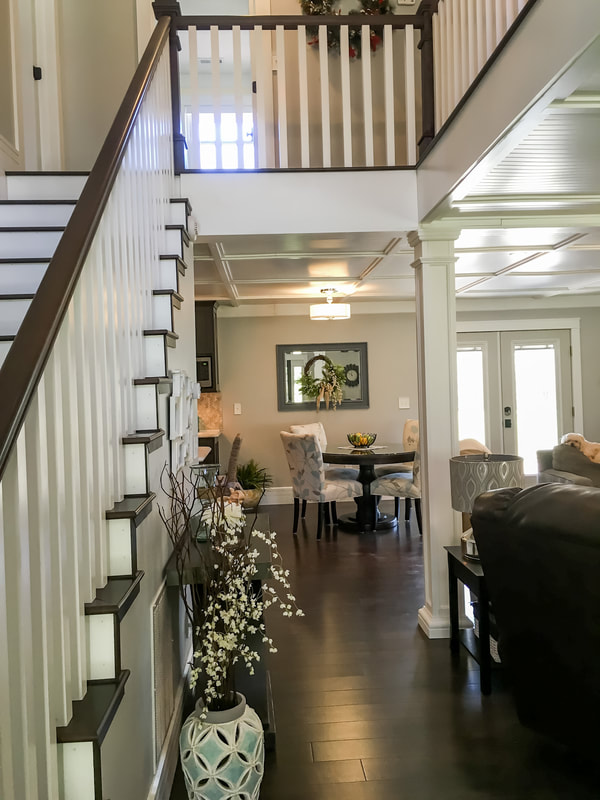
What a difference! This entire home was a complete remodel and took about 5 months to complete. Putting wood on the ceiling was one of my favorite features. What do you think? I'd love for you to leave a comment below and tell me your favorite part of this remodel.
- till next time 
So, what's the difference between a comforter and a duvet cover and why should you choose one over the other? Let me break it all down for you.

Comforters
Comforters are a one-and-done piece, there’s nothing to insert or remove. Just throw it on your bed and go on about your way. Pick something versatile that you can live with for a while since comforters tend to cost more. Comforters can also be more difficult to launder as they are pretty bulky. Make sure your washing machine can handle the size and if not, be prepared to pay for a dry cleaning service or take a trip to the dreaded laundromat.
Duvets
What is a duvet cover? Think of it as a giant pillow sham that will require a little work. You'll need to start with a plain white duvet or white blanket. The duvet cover will slip over this and button or zip up. The good thing is you can change these covers often if you decide to change up your room. Duvet covers are usually less expensive than comforters. Cleaning your duvet cover is much easier since you just slip it off the duvet and throw it in the washer.

I'm not saying one is better than the other, but maybe one is better for you. If you don't love change and have ample laundering options, perhaps a comforter is the way to go. If you do love change, then maybe try out a duvet cover. If you really have no preference, just flip a coin or buy whatever speaks to you.
- till next time

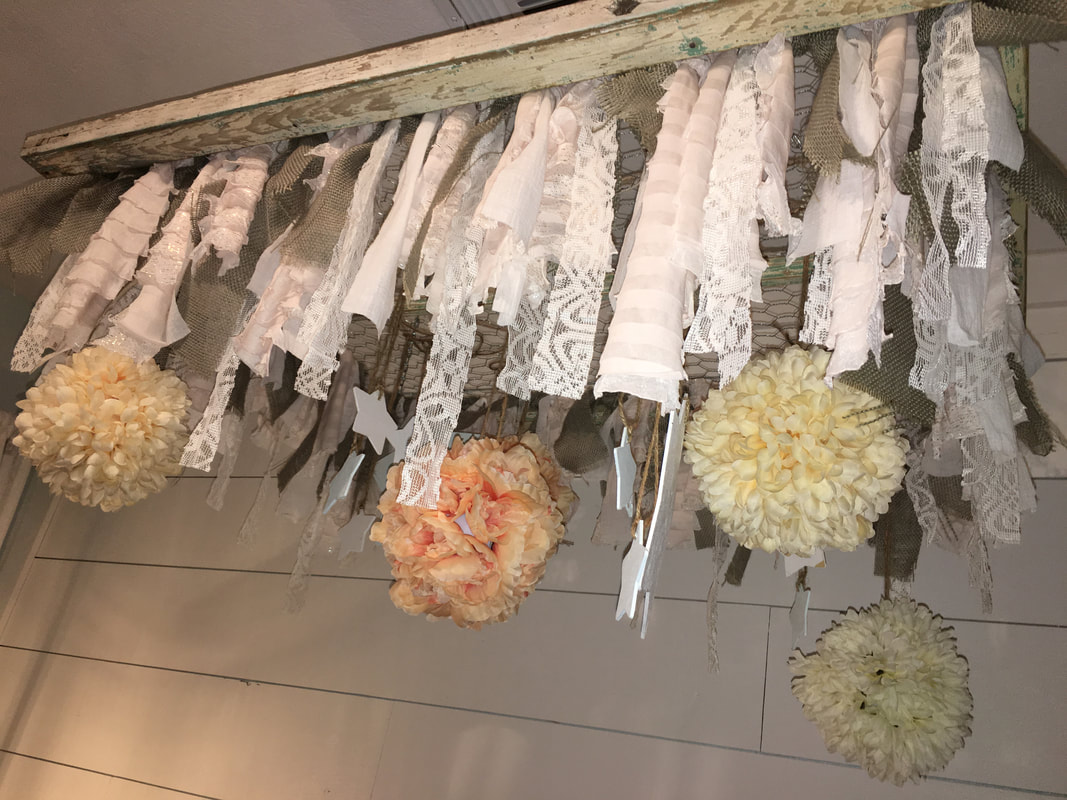
Want a unique, affordable, and adorable DIY crib mobile? Read on....
Materials Needed:
Cut your fabric into 2" wide strips by approximately 24" - 30" long (vary the lengths). Now start tying the strips to the chicken wire around the inner edge of the window frame, alternating your fabrics. 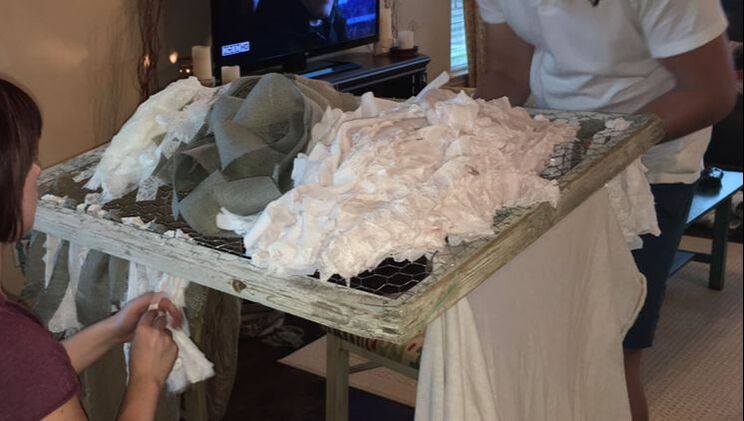
Now attach the stars and flower balls to the inner part of the window. We used jute to tie them to the chicken wire. The final step is to attach an eye-bolt to each corner of the window (we used a bit of wood glue as well for added strength) and then attach your chain to the eye-bolt. Bring all 4 chains up to the middle of the window and attach them to an s hook which you will then attach to your ceiling with the hook of your choice. Your chain length will be determined by your ceiling height and the height you want the mobile to hang above the crib.
*Optional - add a string of fairy or twinkle lights to add a special touch. Either use battery powered or make sure you have an outlet nearby (try to hide the cord). There you go, a DIY crib mobile that is very unique and affordable! You can use any number of items to hang from the inner part such as small stuffed animals, hearts, cowboy hats, birds, beads, etc. If you make one of your own please send a picture in the comment section below, I'd love to see your version. 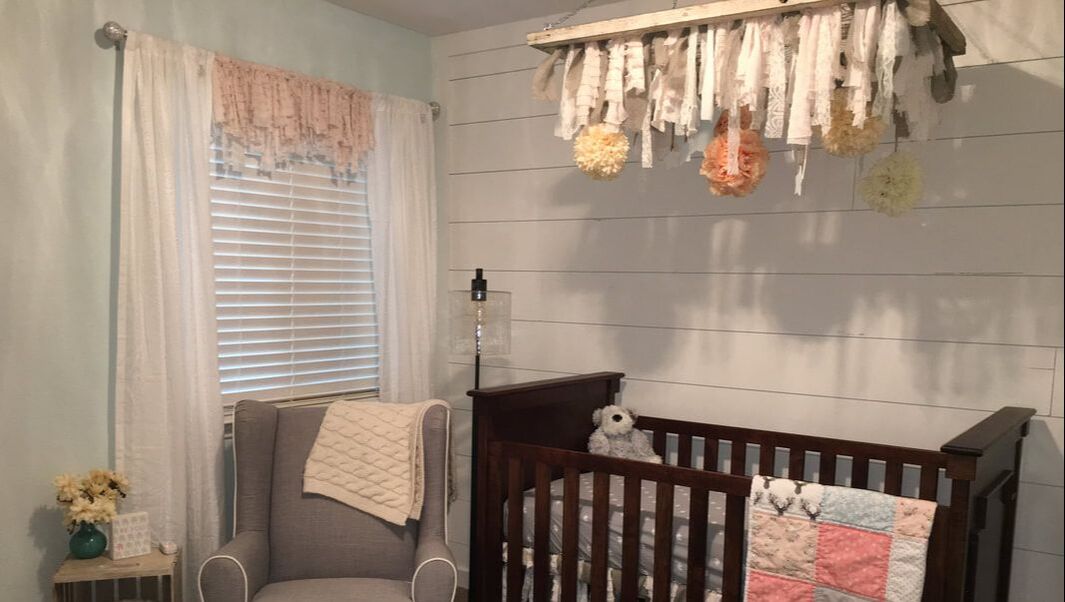
-till next time

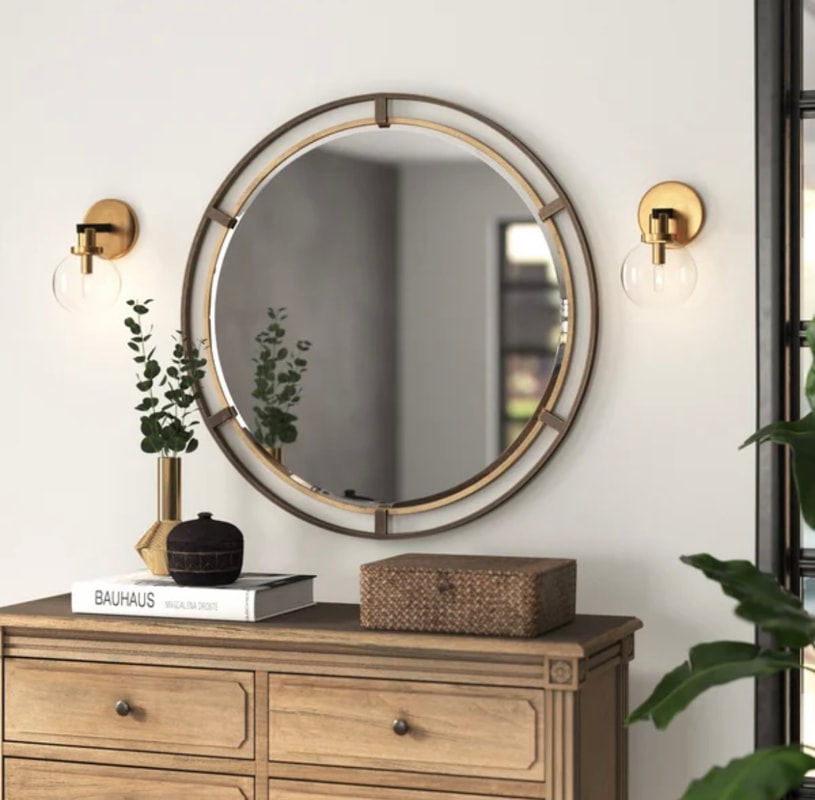
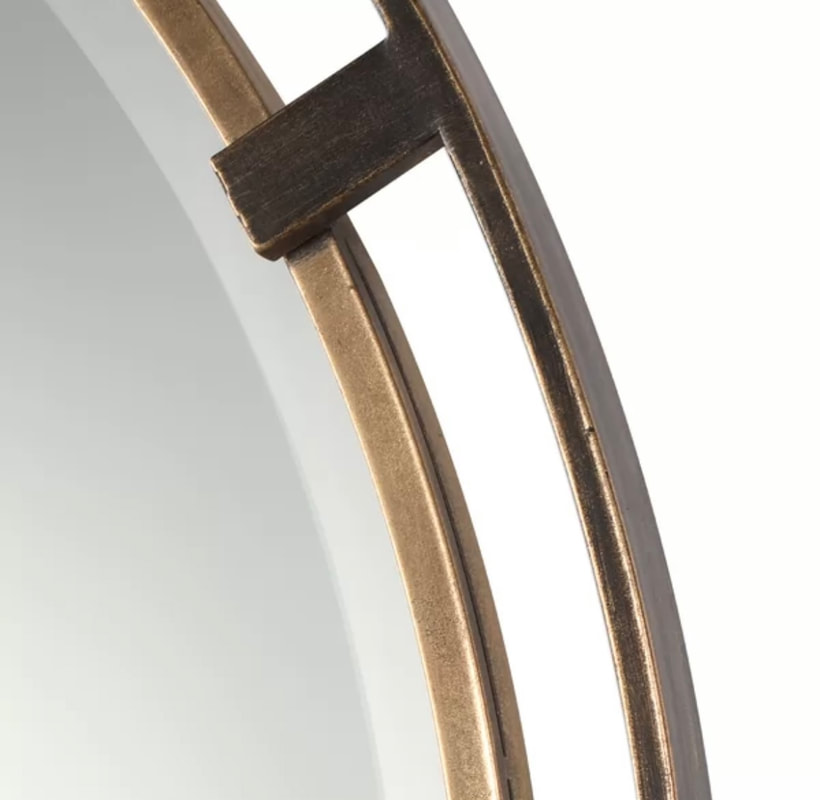
If you are looking for a large round mirror, look no more! I absolutely love this mirror. It is so well made and beautiful. I use it in both my bathrooms as the vanity mirror.
This mirror works well with lots of design styles. It is so elegant and has a high end, designer feel to it. The bronze and gold hues are a beautiful mix and really draws the eye in. 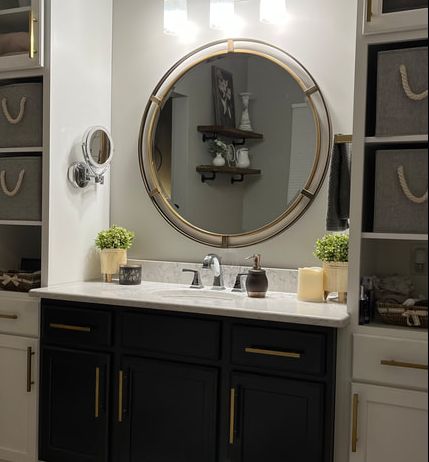
It would also look great in a foyer or a dining room.
As an Amazon Associate I will earn a commission on qualifying purchases at absolutely no extra cost to you.
I can't recommend this mirror enough. I've been around a lot of mirrors and this one stands out among the crowd. You won't be disappointed.
Comment below and let me know what you think or if you have any questions. -till next time 
A little word of warning - putting a 60" vanity in a 60" opening is a pretty big challenge. We had to make modifications to both the wall and the vanity. The plumbing was a nightmare but the fittings were not normal. We were eventually successful and it looks beautiful.
As an Amazon Associate I will earn a commission on qualifying purchases. There will be no extra cost to you.
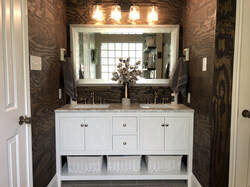
We made the shiplap out of the cheapest pine plywood we could find. We ripped the plywood into 6" strips and then I stained it dark walnut and there was lots of sanding in between. We used a brad nail gun to attach it to the wall studs. Pay attention to where your pipes are located, you don't want to run a nail through your water line!
I love open shelves in a bathroom. They are very practical and can be a great design element if decorated correctly.
Putting money into your bathrooms is a great investment and will produce a better return if you decide to sell your home at some point. If you need a little help, reach out to me! -till next time 
This page includes affiliate links and I may earn a small commission at no extra cost to you – my full disclosure statement is available here.
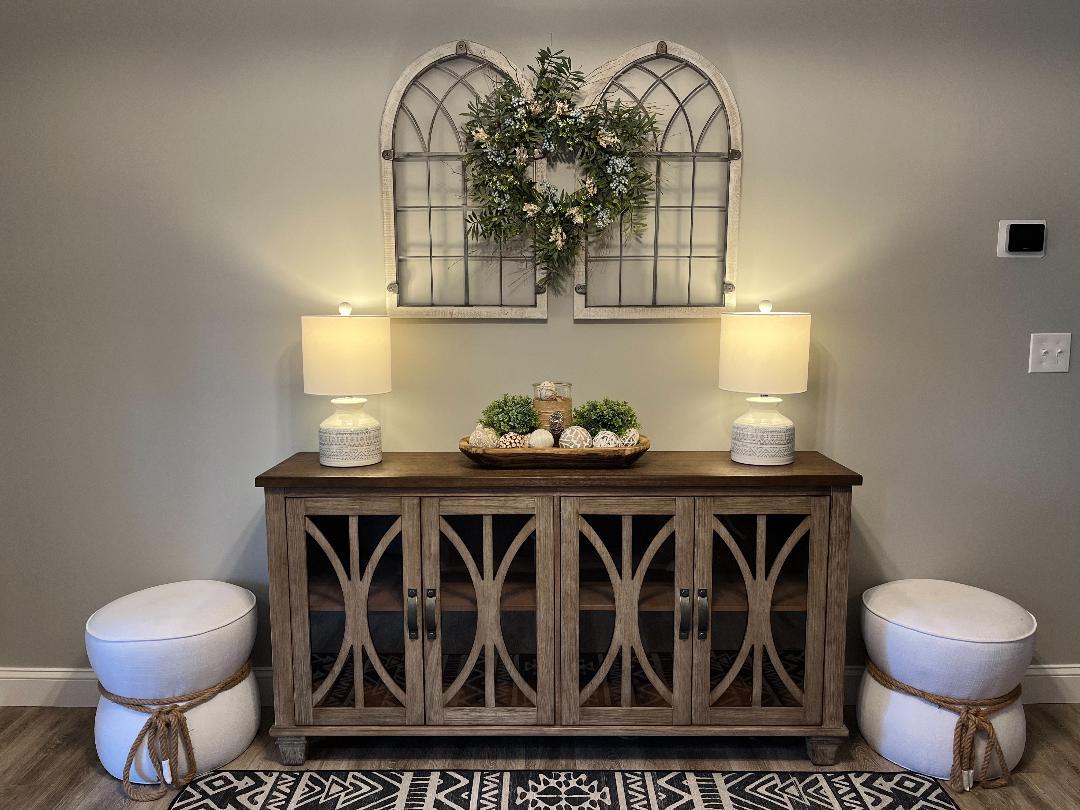
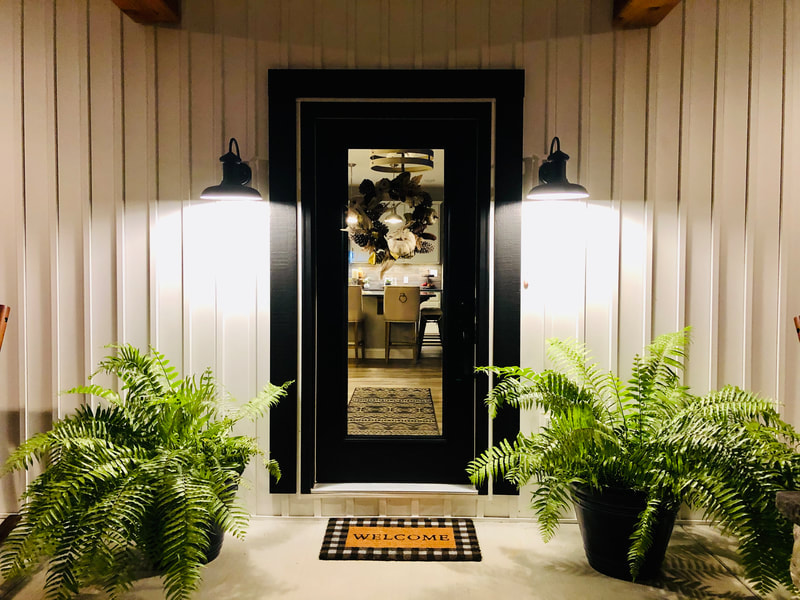
Do you love this look? I love modern farmhouse and this entry is actually in my home. I've made it super easy for you to achieve this look by gathering links to every single piece in this photo. Some were no longer available so I added a similar item that will also work well. Just click on each picture to go to Amazon where you can purchase these pieces if you'd like. You don't even have to leave the house, all these items will be delivered right to your door.
As an Amazon Associate I earn a commission on qualifying purchases at no extra cost to you – my full disclosure statement is available here.
You can get this entire look for around $1,200 (plus taxes possibly). Or you could buy a few pieces if you currently have some decor pieces that are similar. If you have any questions just comment below and I'll get right back to you. I'd love to see pictures of your project if you decide to give this beautiful look a go. Good luck!
Till next time, 
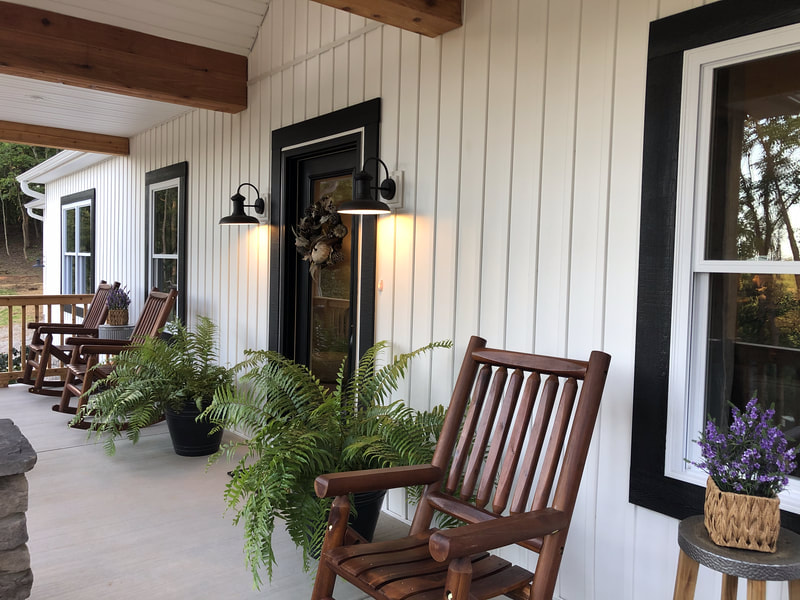
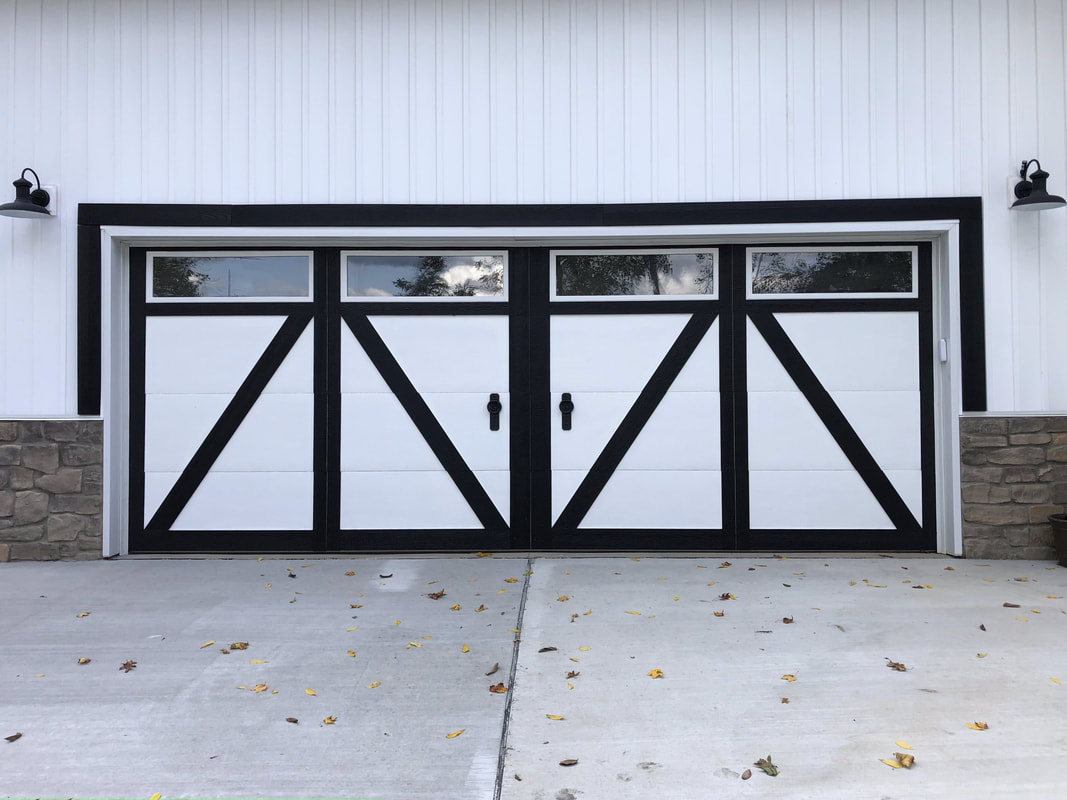
Do you love the look of black windows? I do but the price for them is outrageous so I have a great hack for you and it's really quite easy! Just trim your white windows with wide black trim, and there you go. You get the look of black windows without the added cost. 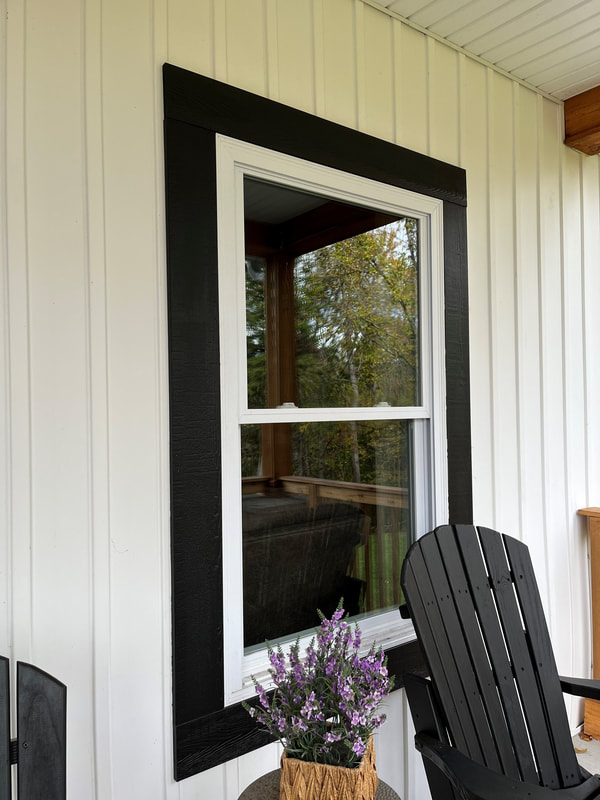 I used 5" all weather boards and painted them jet black with a semi gloss exterior paint. We used a brad nail gun to attach them to the siding. This is a great, inexpensive way to add curb appeal to your home. I also added the black trim around the front door and garage door. This created a cohesive look to the entire exterior of our home.
As an Amazon Associate I may earn a small commission at absolutely no extra cost to you. I have a client who purchased black windows for his new house build. Before the house was even completed, the paint started peeling off his new windows. It was a nightmare. This can also happen if you decide to paint your existing white windows with black paint. So, be aware that could be a problem for you. I now actually prefer this trim method over real black windows. If you decide to give this hack a try, send me pictures of your finished project! I've had a lot of people ask for links to the boards. Click here for a link to the boards at Lowes. Below is an extra little video with a bit more explanation of how I attached the trim. I have a new YouTube channel, click the image below to check it. Be sure to subscribe and hit that notification bell if you want to see more!  Till next time! 
Here's the outhouse I told you about in an earlier post. We built this by our fire pit area so that our guests don't have to trek to the house when they need "to go". This was built with lots of scraps and leftover materials from our house build. The utilized scraps were:
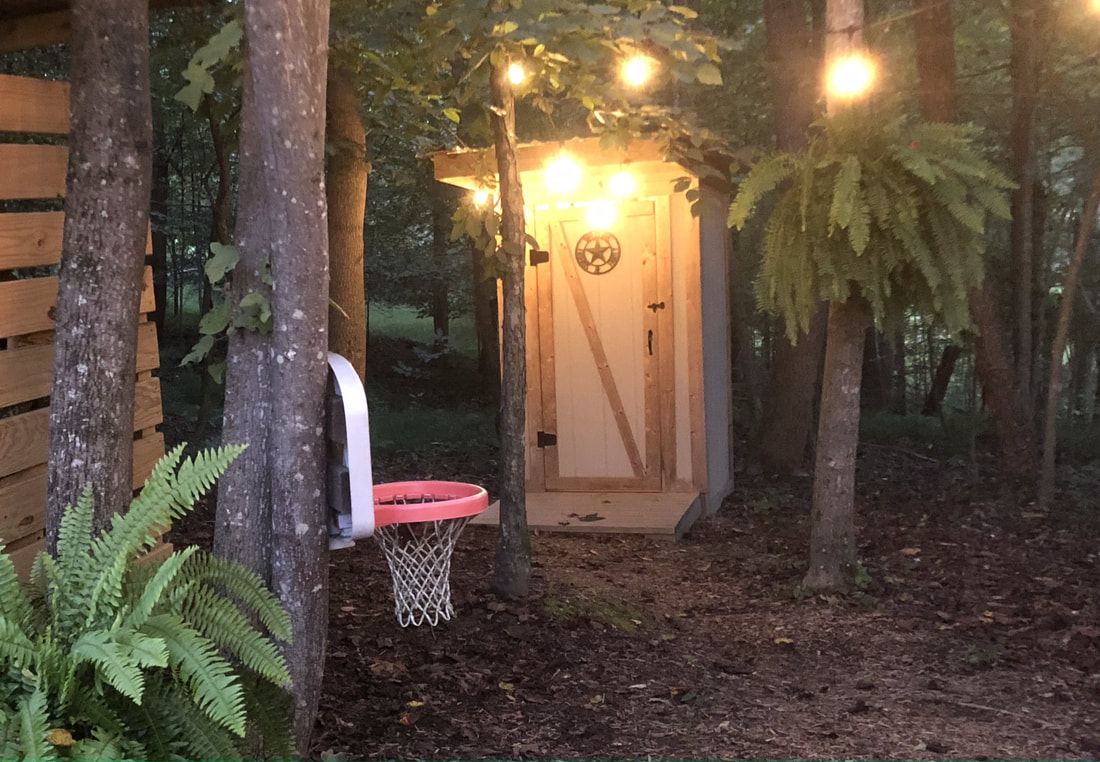
Everyone loves the little outhouse and it's very practical.
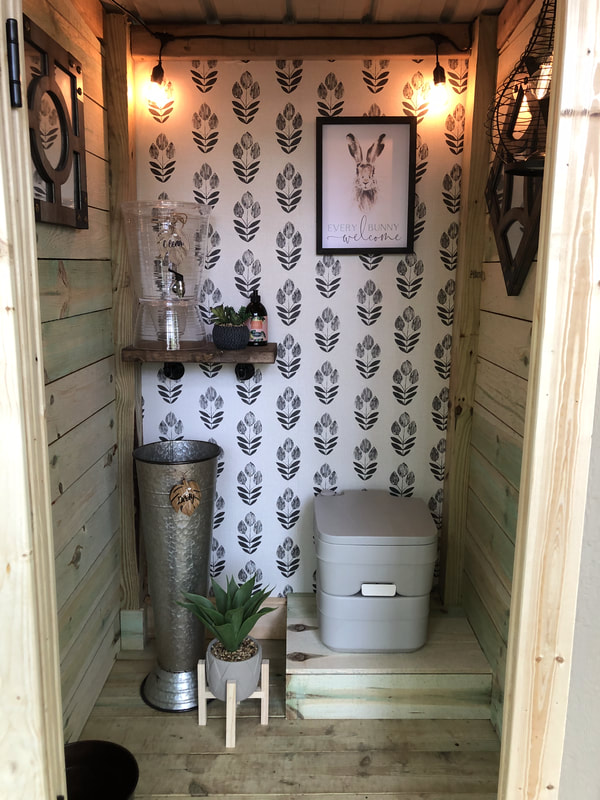
I made a hand washing station by putting clean water in a beverage dispenser and them I put a cute "bucket" below to catch the dirty water.
(As an Amazon Associate I earn a small commission on qualifying purchases at no extra charge to you – my full disclosure statement is available here) We purchased a little portable potty that is easy to empty and clean in order to avoid unwanted smells. Click on the button below to see one similar.
Here is a link to the wallpaper that I used. It is removable so it's very easy to work with.
I'd love to hear what you think about this little outhouse! I have a little video of the outhouse on my Pinterest Page. Here is a link, be sure to follow me here and/or on Pinterest to see more design fun in the future!
Till next time!


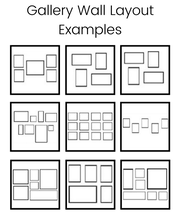
This is just a start to some helpful, easy to follow design tips. This is just the first round of many more to come. I will also be adding links to some great products in the very near future! Order Samples 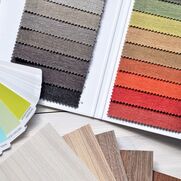 It’s always a good idea to order samples when possible. From wallpaper and paint, to flooring and fabrics, you should always order several samples before committing to any specific material. Place the samples together and visualize how all the elements will work together in the room. Save yourself a lot of time and expense by making educated decisions. Floor Plans  It’s very important to make sure there is room to move around in your home. For example, you should ideally leave about 18 inches between sofas, chairs and coffee tables. This gives you plenty of space for sitting and moving around while still having everything and everyone close. Three is Magical!  Three truly is a magic number when it comes to design. Grouping odd numbers of items forces the eye to move around which creates a level of visual interest that symmetrical, even-numbered arrangements simply can’t compete with. Refresh the Drab  Repainting or refinishing furniture is a simple way to add color and character in your home on the cheap! Search for up-cycled furniture ideas on Pinterest for inspiration. Keep an eye out for more helpful tips. Following me on Pinterest is a great way to keep up to date. Till next time! 
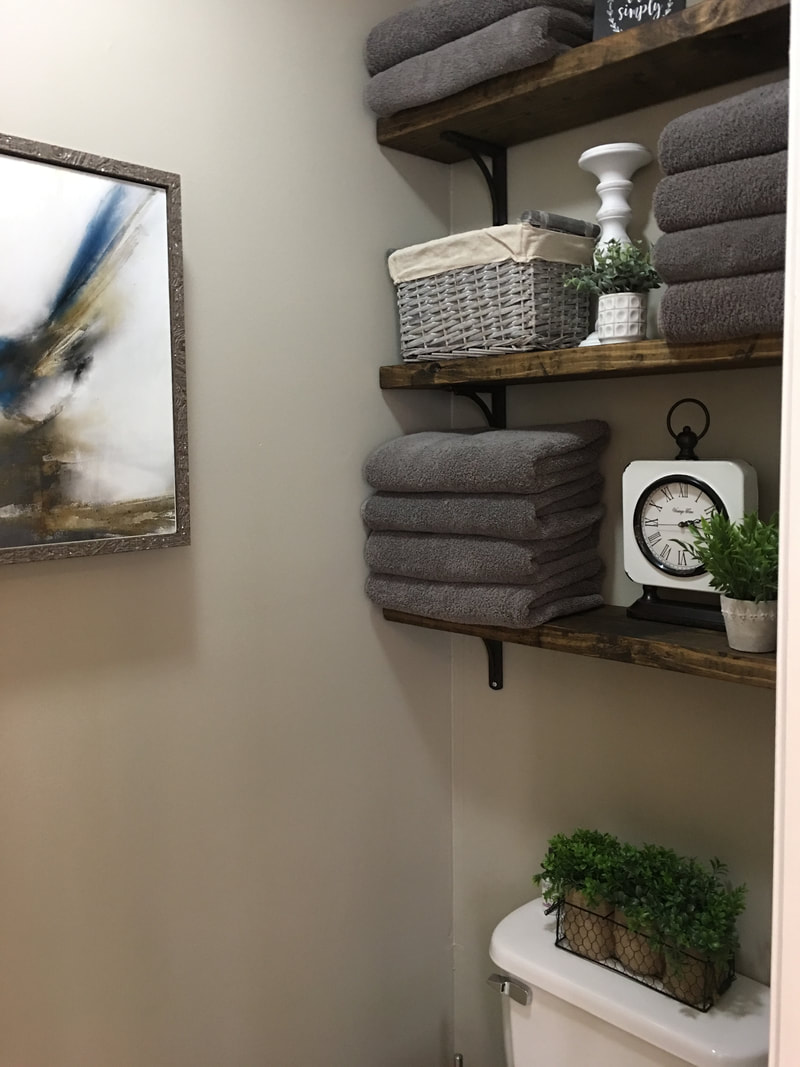
Today’s topic is all about repurposing materials. We built our house in 2020 and there were plenty of scraps left over so I took advantage of a few. First, the builder used temporary stair treads made out of 2x10s going to our second floor. When the real treads were installed he put them in the trash pile. I quickly removed them in thoughts of making shelves out of them. And so I did. I ordered pipe brackets from Amazon to attach them to the wall. They turned out great and everyone loves them. I got a total of 9 chunky shelves for free!
(As an Amazon Associate I earn a commission on qualifying purchases at no extra cost to you – my full disclosure statement is available here)
Next is the loft bed that my husband and I built in the spare bedroom for our grandchildren. We saved every board we found lying around our build site and the only thing we had to buy for this entire unit were two 4x4's. The 2x12's on the stair frame were originally used as form boards for the concrete on our front porch. I chipped and sanded concrete off for hours but it was worth it. I made the stair treads out of wood shelving leftover from the closet organizers we made.
I have a few more things we repurposed but that will have to wait for a later post. Don't forget to follow me on Pinterest if you like this content and don’t want miss anything new.
Till next time!

|
AuthorDebbie Tucker, CID Categories
All
Affiliate
I may include affiliate links in which I might earn a small commission at no extra cost to you. Disclosure Statement |


 RSS Feed